6 minutes
Manually unpacking of packed executable
Introduction
In this post, I will show how to manually unpack a simple executable that has been packed with WinUPack. However, the goal of this post is to provide a general approach to start reversing code and, in general, packers. Because of that it will be hard to cover all the techniques and strategies that could be applied, but I will try to give the rights hints and the mindset to approach these challenges.
I will also try to highlight references to concepts that are almost mandatory to understand when you start doing this activity.
Before to proceed, all files and tools used in this tutorial are available at the following links:
I expect that most of the people that are approaching this post are already aware of packing techniques and how these are generally implemented. However, since I strongly dislike to take for granted even this little details, a good reference to dig deeper about this topic is:
Let’s start to make our hands a little bit dirty :)
Loading .exe file in OllyDbg
As soon as you load this file in OllyDbg you’ll see an error message related to a corrupted PE Header.
However, this error won’t prevent us to debug the application, if we try to run it (F9) the application stopped at 770A01C8 (in my case) and if you follow the execution step-by-step (F8), it will terminate almost immediately with a message box.
So let’s step back where the application stopped. On the stack tab, we’ll see something like this:
0018FFF4 | 00401018 | UnPackMe.00401018 |
Since it is the only function that is still in the stack, we could be confident that it represents the address of entry point of our PE. This insight is confirmed exploring the PE Header, in fact we saw the ImageBase = 400000 and the AddressOfEntryPoint = 1018 (since it is a relative address, we need to sum it with the ImageBase).
According to the information acquired, we could start placing a breakpoint at 00401018 and try to follow the execution step-by-step. After few instructions the stack tab should be similar to this one:
......
0018FF80   75581222  kernel32.GetProcAddress
0018FF84   755849D7  kernel32.LoadLibraryA
0018FF88   004271B0  UnPackMe.004271B0
0018FF8C   755833CA  RETURN to kernel32.755833CA
0018FF90   7EFDE000
0018FF94  /0018FFD4
0018FF98  |770C9ED2  RETURN to ntdll.770C9ED2
0018FF9C  |7EFDE000
0018FFA0  |7540DB7C
0018FFA4  |00000000
0018FFA8  |00000000
0018FFAC  |7EFDE000
0018FFB0  |00000000
0018FFB4  |00000000
0018FFB8  |00000000
0018FFBC  |0018FFA0
0018FFC0  |00000000
0018FFC4  |FFFFFFFF  End of SEH chain
0018FFC8  |77101ECD  SE handler
0018FFCC  |0253E188
0018FFD0  |00000000
0018FFD4  \0018FFEC
0018FFD8   770C9EA5  RETURN to ntdll.770C9EA5 from ntdll.770C9EAB
0018FFDC   00401018  UnPackMe.00401018
0018FFE0   7EFDE000
0018FFE4   00000000
0018FFE8   00000000
0018FFEC   00000000
0018FFF0   00000000
0018FFF4   00401018  UnPackMe.00401018
0018FFF8   7EFDE000
0018FFFC   00000000
As you can see from the stack, we have the SEH (structured exception handling) and on the top of it, there are two interesting functions (GetProcAddress and LoadLibraryA).
GetProcAddress retrieves the address of an exported function or variable from the specified dynamic-link library (DLL), instead the function LoadLibraryA loads the specified module into the address space of the calling process (note that this module may cause other modules to be loaded).
Since we are trying to follow a repeatable approach, according to the information retrieved so far we could start guessing (and then proving or refusing) something about the application. As far as we know, the application starts to load some dll (e.g., kernel32.dll) and then from each of them retrieve all functions that are needed for the executable. Then when everything is correctly settled, the application should go back to the OEP (Original Entry Point).
In order to follow this insight its important to understand where these function are called and place a breakpoint there.
Examining a function call
From here, there are uncountable ways to move forward in order to find the OEP. We could look through the code to understand where GetProcAddress or LoadLibraryA are called for the last time, or we could also find the last function and the last library loaded and from that point move forward to reach the OEP, otherwise we could also look for specific blocks that are commonly used to save the OEP.
However, showing a specific technique is out of scope (as I said, I would like to give some hints and a mindset to approach to these challenges), I’m going to explore a little bit more the binary in order to be able to retrieve the OEP, dump the binary and restoring also the IAT (Import Address Table).
After these clarifications we are now ready to proceed with our analysis.
Since we were able to identify GetProcAddress and LoadLibraryA functions on the stack, we could easily move forward until we don’t see that these function are actually called within the UnPackMe address space. In my case, these functions are called from the UnPackMe address space at the following addresses:
- LoadLibraryA 0049A053
- GetProcAddress 0049A06A
Now let’s go deep a little bit in detail, examining the LoadLibraryA function call and its returning value (the approach is the same for GetProcAddress ).
If you followed the link related to this function you are now aware that LoadLibrabryA take a single parameter that represents the module name. According to the calling convention in x86 this parameters are commonly pushed on the stack, instead the return value is stored in the EAX registry.
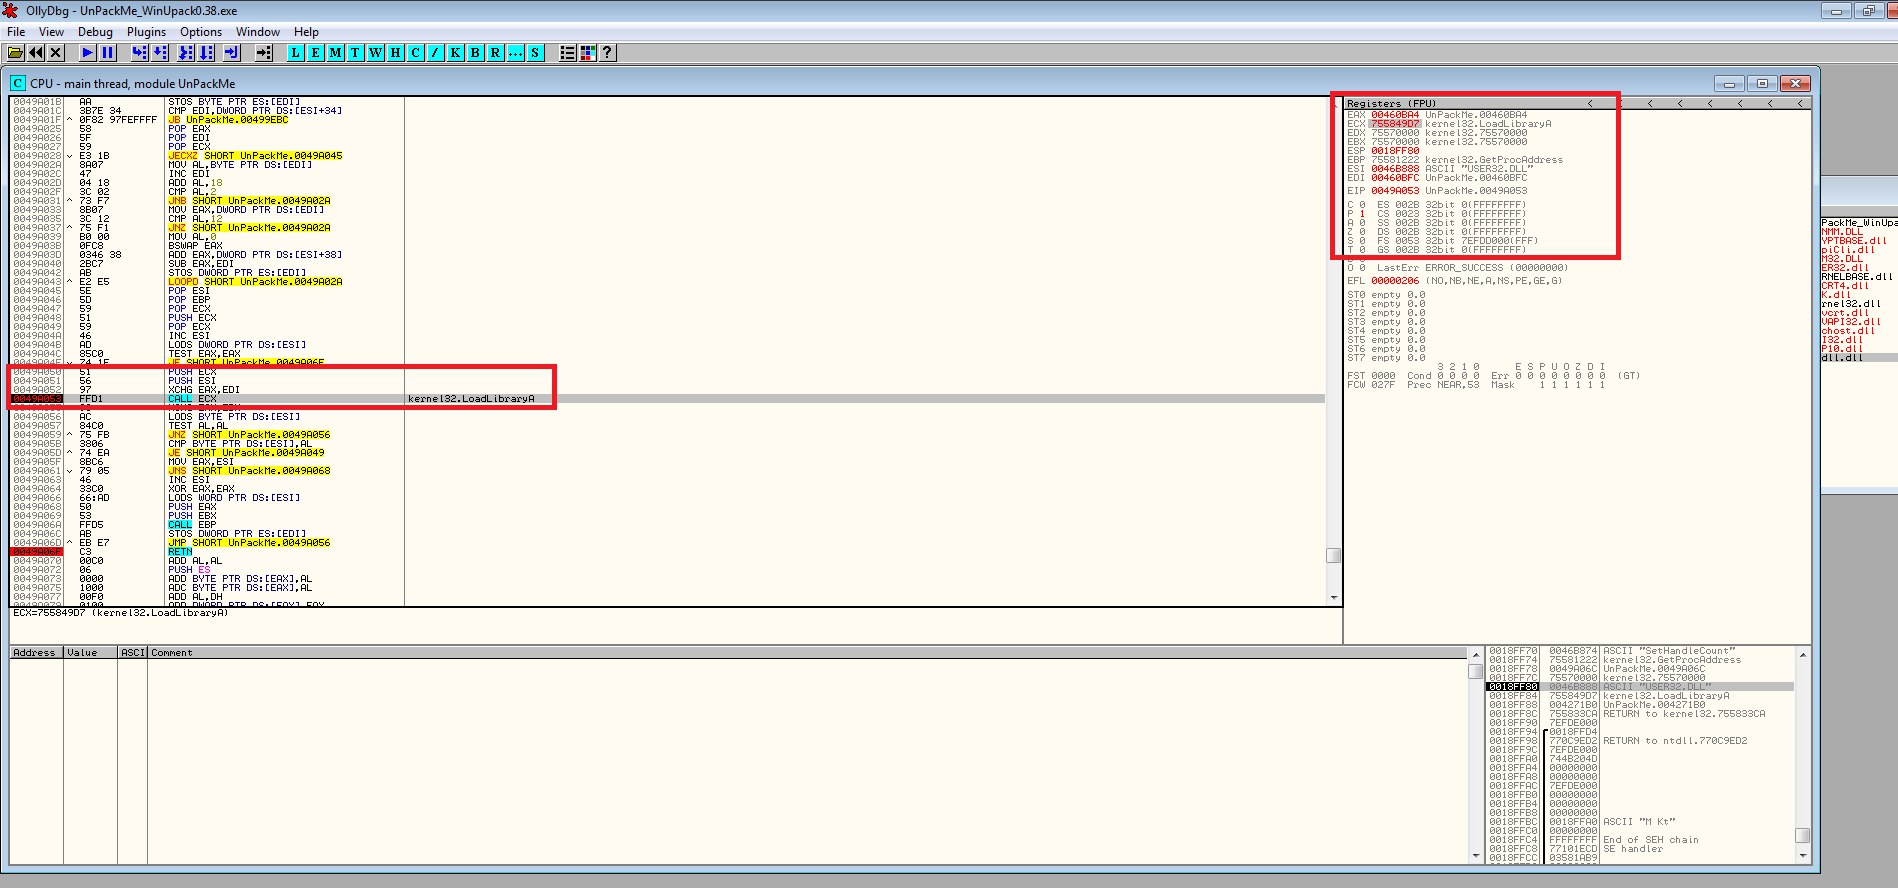
From the figure above It is easy to spot that:
- ESI contains the module name “USER32.DLL”,
- ECX contains the function address of LoadLibraryA.
In order to check if EAX contains the module’s handler, we do a single step forward after the call ECX instruction. After that instruction we are able to see that EAX contains the handler for the module USER32.
EAX 74EA0000 OFFSET USER32.#2338
Eventually, when the last call to the LoadLibraryA and GetProcAddress are performed the EIP will reach the address 0049A06F that contains the RETN instruction that will lead us the actual OEP.

Since we were able to go back to the OEP, we are also confirming that our initial hypothesis was correct! (Yes I cheated a little bit, since I already knew that it was the right path :) .
From now on, its just a matter of:
- Dump the executable with Ollydump
- Attach to the debugging process with ImportREC
- Set the new OEP and search for the IAT.
- Fix dump
These steps are left as homework for the few people that reached this point :)
Conclusion
To conclude, in this brief post we saw how to manually examine a binary that has been packed, looking for clues, formulate hypothesis and then working to confirm or reject them.
In my experience, reversing isn’t going in the middle of the code without an idea, it’s important to follow a method that should be as general as possible. In order to get better, I strongly recommend to practice with other sample trying to apply the same approach we saw here.
In case of doubts, unclear part, or just feedback about this post, feel free to reach me on my mail account.
1173 Words
2021-09-02 02:00