5 minutes
Dynamic Binary Instrumentation for Malware Analysis
Introduction
Because of the massive Ursnif campaigns that hit Italy during the last weeks, I was looking for a lightweight method to quickly extract the last infection stage of all collected samples, in order to start further analysis effectively. Due to this, I wrote a little frida script that performs basic Dynamic Binary Instrumentation (DBI) to monitor useful function calls and extracts the Ursnif payload. In this article I am going to briefly discuss this script and the steps needed to start analyzing the resulting binary.
Since I would like to skip redundant topics that are already written all over the internet by people that are Jedi in this field, I’m going to limit this post linking references that would be nice to have to understand everything easily.
Intercepting function calls
Most of the time, malware, in order to write memory and run code from the newly allocated space, make use of two functions, such as: VirtualAlloc (ref.) and VirtualProtect (ref.). For the purpose of our task, I have chosen the VirtualProtect function, because at the time of its calling, the data (payload) should be already there and it would be easier to analyze.
So let’s start to write out the code that retrieves the reference of this function and the interceptor that is going to be used to monitor function calls entry and return. Thanks to Frida, it is possible to directly retrieve function arguments through the variable args and check their values. The most important parameter and the one that will be used for our purpose is the lpAddress that represents the address space that is involved in this function call.

Figure 1 - References to VirtualProtect and call Interceptor
Because of the purpose of the article we are not interested in all VirtualProtect calls but we would like to limit our scope to ones that contain a PE header. To do this, it’s possible to verify if lpAddress starts with “MZ” or “5d4a”. If so, we could print out some values in order to check them against the running executable using tools such as ProcessMonitor or ProcessHacker.

Figure 2 - Printing VirtualProtect arguments
Retrieving the payload
Now comes the tricky part. If we simply apply this technique to dump the memory that contains the MZ, it would be possible for us to also dump the binary that we originally started the infection with. However, analyzing Ursnif code, it’s possible to see that it creates a dedicated memory space to write its final stage that is commonly referenced as a DLL. In order to avoid that, it’s possible to use a function findModuleByAddress that belongs to the Process object.
As reported by Frida documentation:
Process.findModuleByAddress(address) returns a
Modulewhose address or name matches the one specified. In the event that no such module could be found, the find-prefixed functions return null whilst the get-prefixed functions throw an exception.
In order to avoid exception handling stuff I have preferred to go with find prefix function and then checking if the Module returned is equal to null. Otherwise, we would have an existing module object and module.base = image base.
Now, as a final step before moving on and dumping the actual payload, it’s necessary to retrieve the page size to which lpAddress belongs. That information could be retrieved using the findRangeByAddress that return an object with details about the range (memory page) containing address.

Figure 3 - Checking for payload address
Dumping config file
Now that we have all the information required, it’s time to dump the actual Ursnif payload. In order to do this, it’s possible to read the page related to lpAddress using the readByteArray using the module.size. Once the information has been stored, it’s possible to write it in a file that could be used later on for further manipulation and analysis.

Figure 4 - Dumping Ursnif payload
It’s worth noting that before proceeding with the configuration extraction phase, it’s necessary to modify Raw addresses and Virtual Addresses of each section header accordingly. This step is necessary because the payload was extracted directly from memory.
Script Testing
Now that we have completed our script it’s time for testing with a real case! Let’s take one of the recent samples delivered by the TA and see if it works. For this example I have chosen a publicly available sample on MalwareBazar.
Running the script against this sample with Frida as follow:
frida.exe <mal_executable> -l <your_script.js>
It will produce a file called 0x2cf0000_mz.bin (it may vary from the memory address allocation on your machine).
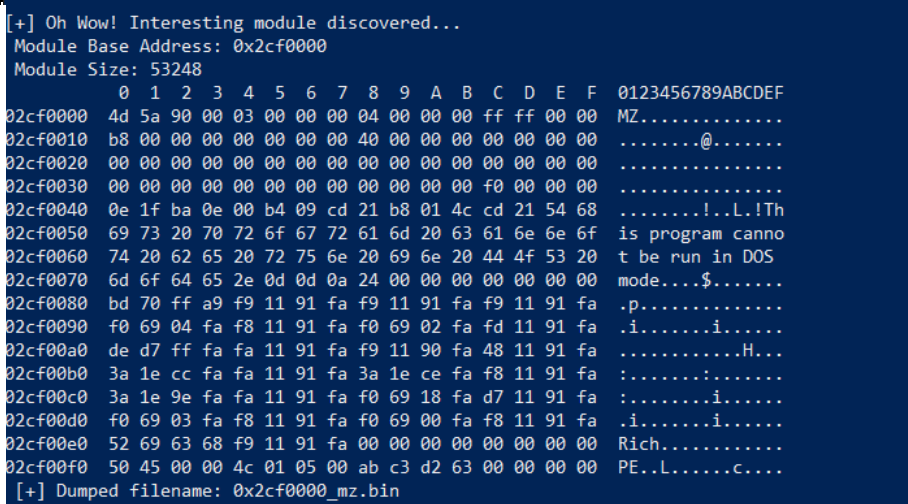
Figure 5 - Ursnif payload extraction with Frida
If we open this file with PE-Bear, what should alert us, is the import table that contains unresolved information. This happens, because our code has been extracted directly from memory and before proceeding with our analysis it is necessary to map the raw sections addresses with their virtual counterparts (for brevity I have prepared a script that is going to perform these steps automatically). After having settled the addresses properly, it’s possible to proceed with configuration extraction through a custom script (that is out of the scope for this post).
Reference
- DBI script: mon.py
862 Words
2023-03-14 01:00