8 minutes
Applied Emulation - Decrypting Ursnif strings with Unicorn
Introduction
Here we go with another chapter of the Applied Emulation series. In the previous blogpost we have talked about emulation and more specifically, the usage of Dumpulator to perform a quick triage. However, in this blogpost we are going to use a completely different approach, taking advantage of static analysis to understand and emulate a string decryption algorithm through Unicorn. As always, I would like to give a practical example on a real case scenario. Because of that, I have chosen to analyze an Ursnif sample.
It’s worth mentioning that this sample is part of weekly challenges related to the Zero2Auto course. However, instead of automating the full code extraction, as requested by the challenge, I found even more interesting going into unexplored paths applying emulation instead.
Unicorn challenges
Using pure static analysis came with few limitations, in fact, Unicorn is a CPU emulator framework that does not have built in capabilities to invoke syscall directly. Because of that we need to overcome at least a couple of challenges before emulating our code:
The first and probably the most challenging constraint is that we are going to emulate CPU instructions, instead of using direct calls to Windows API. Because of that, we need to choose our code carefully.
After that we have identified a candidate algorithm, we still need to set up the emulation environment variables (e.g., stack memory, registers, sections, start and end code, algorithm parameters, etc…).
Speaking about “good candidate function”, we could look for a custom and self-contained algorithm. Even if those requirements seem to be strict constraints, an experienced reverser knows that most of the malware out there have these components as a part of their decryption routine. However, let’s take a step back. Someone may wonder why we don’t use Dumpulator instead of Unicorn, considering all these limitations. The answer is straightforward:
Dumpulator may not be usable if we are unable to run the code and set up the user mode space. Nevertheless, I strongly believe that it is more important to understand where and when a technique should be applied, even if it adds a few layers of complexity, rather than rushing for the easiest or the first solution that comes to our mind.
Ursnif decryption routine
Decryption routine is pretty straightforward to locate, it just follows the campaignDate variable that is going to be used as a decryption key for the .bss segment. Key generation algorithm has been already described here, however, I would like to focus on the decryption routine itself, in order to understand all requirements to emulate this code.
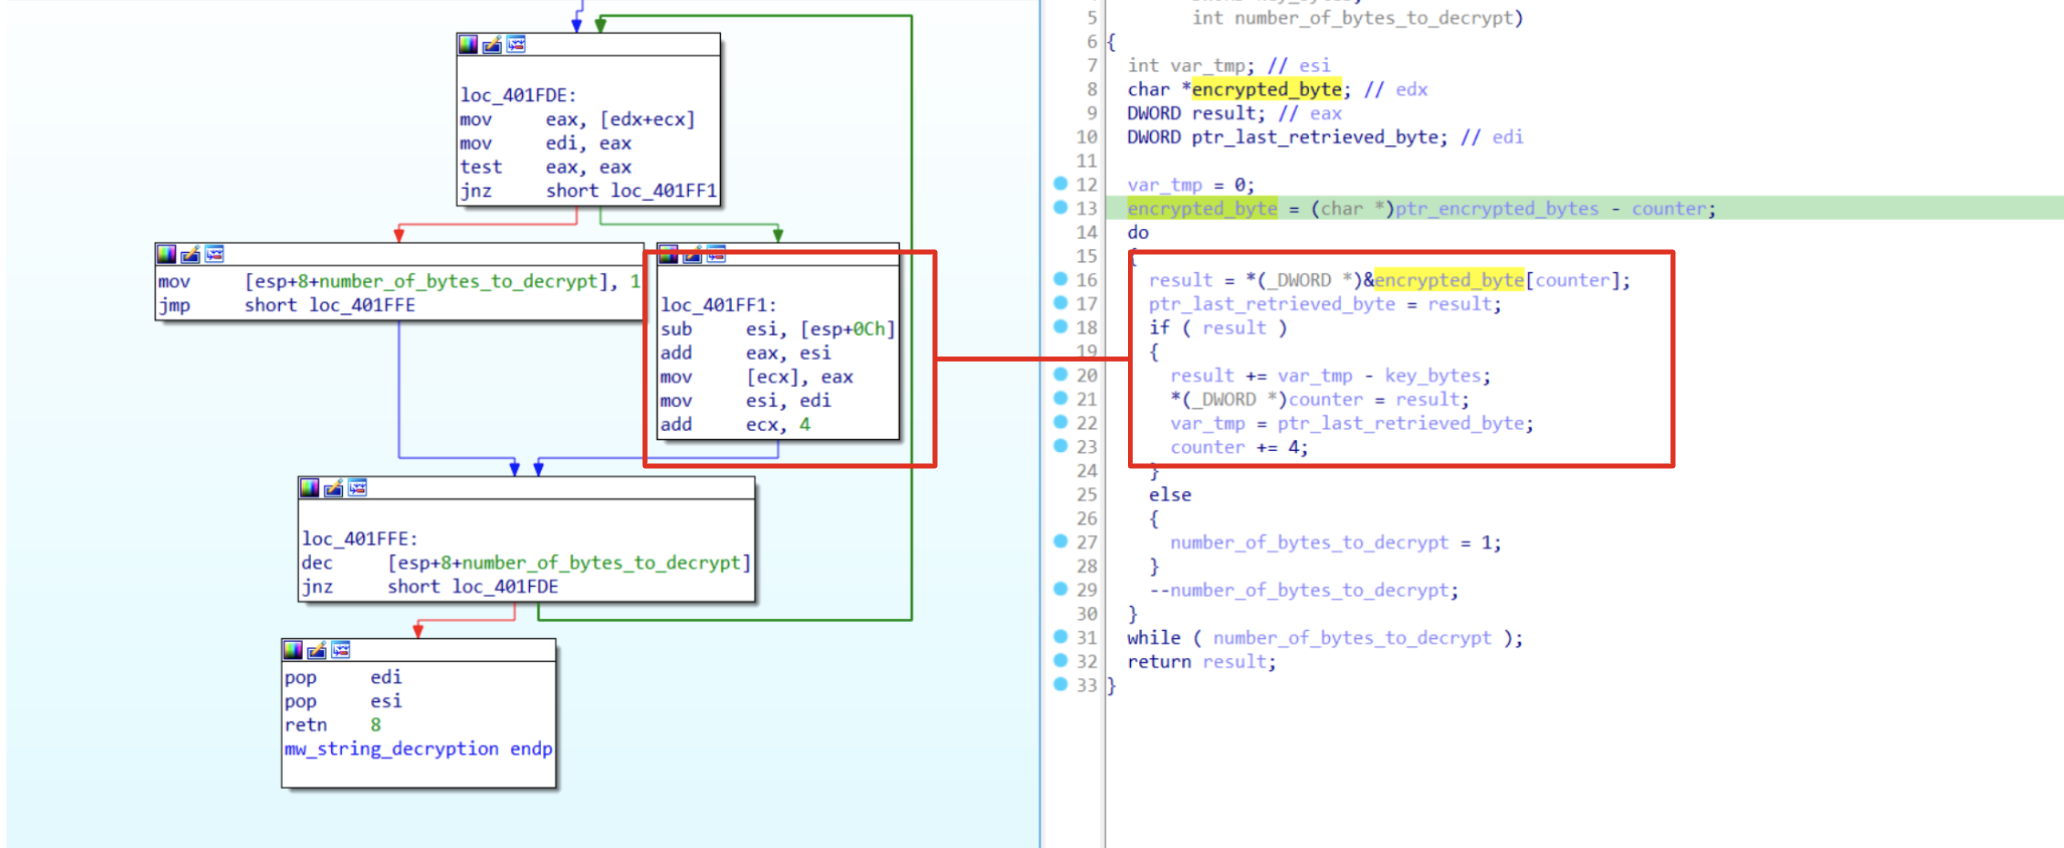 Figure 1: Decryption routine explained
At the first glance we could see that the function is self-contained and most of the operations are simple math (sub, add) that involves the key and the encrypted data. However, before proceeding it’s important to have a look at the following instruction:
mov [ecx], eax
[ecx] is going to be the place to save the output of each decrypted byte. Nevertheless, ecx is also used as a counter to get the next byte from the .bss segment:
mov eax, [edx+ecx]
Because of that we need to handle that situation very carefully. In fact, if we do not consider those instructions, we are going to have an access memory violation with ecx pointing to an unallocated memory region. In order to solve this issue, there are two ways:
- Allocating memory at 0x000000. In this case, ecx will be used as a counter and as a pointer without any issue;
- Otherwise, we could use a hook on our emulator that is going to analyze each instruction and when we are dealing with [ecx], we could skip that instruction, redirecting the decrypted output towards another variable.
For this blogpost we are going to use the first solution. Considering this post as an introduction of Unicorn, I don’t want to overwhelm readers with a lot of content (setting up the environment will be quite challenging to follow). It’s always good to master some basic concept before proceeding towards more advanced techniques
Setting up emulation environment
from unicorn import *
from unicorn.x86_const import *
import pefile
import struct

file_data = open('unpacked_ursnif.bin','rb').read()
pe = pefile.PE(data=file_data)

for s in pe.sections:
    if b'.bss' in s.Name[:6]:
        bss_virtual_address = s.VirtualAddress
        bss_section_size = 0x1000
        bss_section_data = s.get_data()
First of all we need to import the Unicorn module and also unicorn constants that we are going to use to interact with registers. Then we could use the pefile module to load our bin file and take notes of .bss segment data..
Then, we need to take the whole code that needs to be emulated. Before proceeding, it’s important to keep in mind that emulation is quite slow and we need to use only the code needed for our purpose. For instance, prolog and epilogue instructions are not very useful for us, since we are emulating a single function without knowing any information about previous ESP and EBP values. Because of that we could skip them.
To get the proper bytes, with IDA, we could highlight the code that is going to be emulated and, using shift+e, spawn a popup with all selected bytes, ready to be pasted in our code.
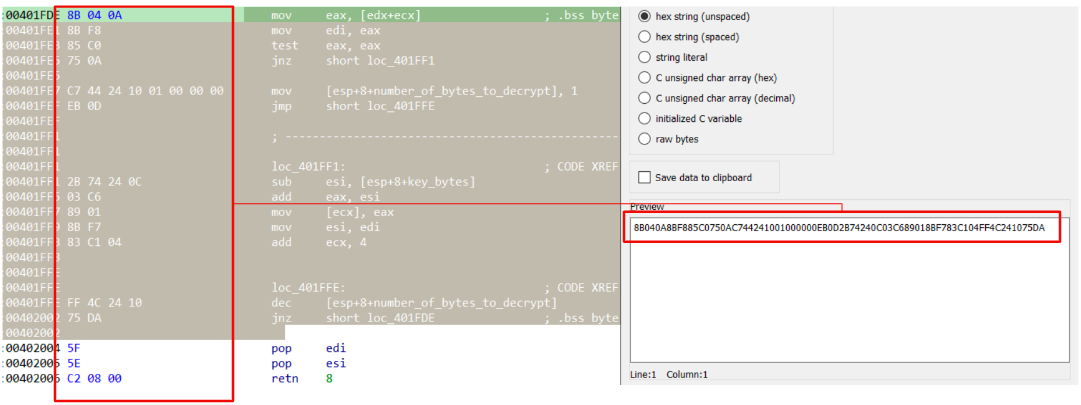 Figure 2: Select code to emulate
code = bytes.fromhex('8B040A8BF885C0750AC744241001000000EB0D2B74240C03C689018BF783C104FF4C241075DA')
Now things are starting to heat up, trying to settle our emulation. First of all, we need to instantiate Unicorn, then we need to set up stack memory, ESP, data memory (using .bss content) and then fill the code section with our bytes. To make it easier to read, I have split the whole script in multiple parts, as follow:
# Unicorn emulator setup.
uc = Uc(UC_ARCH_X86, UC_MODE_32)

stack_base = 0x00100000
stack_size = 0x00100000

# ESP is moved in the middle of the stack in order to handle.
# instruction that uses ESP as base address (e.g., [esp + 0xc]).
ESP = stack_base + (stack_size // 2)

# Map the stack memory into the emulator and feed it with null byte.
uc.mem_map(stack_base, stack_size)
uc.mem_write(stack_base, b"\x00" * stack_size)
# Write python variable ESP in emulator ESP register.
uc.reg_write(UC_X86_REG_ESP, ESP)

data_base = 0x00200000
data_size = 0x00100000

# Map the data memory with r/w/x permissions avoiding access violation.
uc.mem_map(data_base, data_size, UC_PROT_ALL)
uc.mem_write(data_base, b"\x00" * data_size)
# Data section needs to be filled with .bss data.
uc.mem_write(data_base, bss_section_data)
Through this snippet of code, we have prepared everything related to the stack and data section. More precisely, with uc.mem_map we have mapped a memory address with its size and protections ( rwx permissions have been chosen to avoid exceptions).
It’s worth mentioning that, what really makes those memories different is the ESP register that represents a pointer onto the stack. However, under the hood, there are no differences between the allocated memories.
# ----- Arguments Setup --------- #
# Setting up key parameter.
key = gen_key(bss_virtual_address)

# Generate key bytes.
key_bytes = struct.pack('<I', key)

# Write key byte on the stack.
uc.mem_write(ESP, key_bytes)

# key bytes are located at ESP+0xC.
# To handle that istrution properly, we need to shift ESP of 0xC bytes.
ESP -= 0xC

# EDX is going to be used as a pointer to the encrypted data.
# It will be used as a base address: [edx + ecx].
# It needs to be initialized at base address of our data.
uc.reg_write(UC_X86_REG_EDX, data_base)
# ECX is a counter starting from 0.
uc.reg_write(UC_X86_REG_ECX, 0)
# Write new stack position.
uc.reg_write(UC_X86_REG_ESP, ESP)

# ----- Arguments Setup End ----- #
In order to get the key, we have called a gen_key routine (omitted here, to focus on emulation setup) that is going to return a string containing the decryption key. Then, once we get the key, we have to store it on the stack, respecting the little endian format. Along with key parameters we have also settled all other arguments needed for the function, such as: encrypted data (edx), counter (ecx) as well as updated the esp according to the instruction [esp+0xC] that is going to take the key bytes.
# ---- Handling ECX access violation ---- #
# mov [ecx], eax.

decrypted_base = 0x00000000
decrypted_size = 0x00100000

uc.mem_map(decrypted_base, decrypted_size, UC_PROT_ALL)
uc.mem_write(decrypted_base, b"\x00" * decrypted_size)

# -- Handling ECX access violation end -- #
As mentioned above, since that ecx will be either a pointer and a counter, we are going to create a memory space located to 0x00000000. In this case, when we are going to deal with mov [ecx] ,eax instruction, we will avoid any exception.
To conclude we need to setup memory for our code. This is a pretty straightforward task if have followed the previous steps. Map the code address, fill it with null bytes and then write the bytes stored in the code variable.
code_base = 0x00400000
code_size = 0x00100000

# Map target memory with r/w/x permissions
uc.mem_map(code_base, code_size, UC_PROT_ALL)
uc.mem_write(code_base, b"\x00" * code_size)

# Write our code into the target memory
uc.mem_write(code_base, code)
code_end = code_base + len(code)
uc.emu_start(code_base, code_end, timeout=0, count=0)
Now we have satisfied all setting requirements for our emulation and its time to test it out.
Testing
Running our emulator against few Ursnif samples reveal that we have correctly settled all the environment variables. As you can see from the image below, it has been possible to retrieve all encrypted strings. Some of them could be very useful in order to do a step further in our analysis, since that we have references to infrastructure, powershell script as well as network requests template.
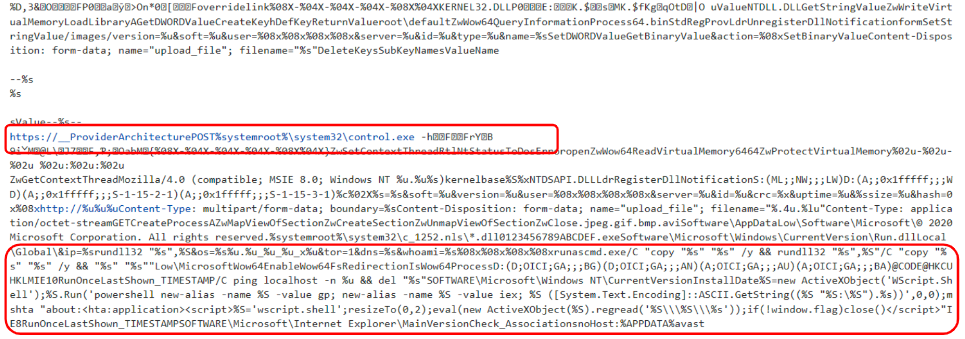 Figure 3: Decrypted strings
Conclusion & Further Development
Emulation is a powerful tool, like a swiss knife, and it needs to be considered anytime we are dealing with malware automation. I hope that some of you had fun reading this post and learnt something new, to the point that you can’t wait to apply this technique to your own sample.
I’m still planning to write some structured content about this topic. I don’t have a deadline for that but it is in my new year resolution list! In the meantime, keep reversing!
References
Sample analyzed:
Unicorn:
Emulator:
1673 Words
2023-12-20 01:00