13 minutes
Symbolic Execution for fun and Flare-On
Emulation is my passion. I apply it as much as I can in countless scenarios—sometimes for practical purposes, and sometimes just for fun. Recently, I’ve been diving into angr, and after weeks of banging my head against it, a few questions crossed my mind:
Has anyone ever tried using angr for something meaningful, only to end up frustrated because nothing seemed to work? Or followed an angr tutorial based on CTF code, thinking, “Wow, this looks easy—I’ve got this!”—only to realize you’re in way over your head?
Well, that’s exactly where I found myself. 😑
Nevertheless, I found quite interesting tutorial about symbolic execution and I really recommend the course on OpenSecurityTraining2. It’s a generic course but it also gives some really good basic of angr usage. Unfortunately, what is really missing on the web (or at least I didn’t find it) is something that goes over the basic.
Unfortunately, most of the tutorial covers the following scenario: “Take a binary, run it from the beginning, set few values for addresses to reach and avoid, get the result”. Through this post I would like to go a little bit further from the basic and setup angr properly in order to handle a function within the binary, setting the requirements and evaluate the actual result. In my opinion this simulates a more real case scenario where you don’t really need or can’t execute the whole binary from scratch. For this post I am going to use the challenge #10 of Flare-on 2024. However, instead of starting the challenge from scratch, it would be more beneficial for this tutorial to focus directly to the angr-related concepts and general requirements needed for it.
💡 I’d like to point out that I always strive to create content with immediate, real-world applicability. While this post might initially seem CTF-oriented, it’s not—the challenge I’m discussing is particularly interesting because it closely resembles a “ransomware-like” binary. It involves file decryption and even a virtual machine interpreter, making it highly relevant beyond CTFs. Given the binary’s complexity, it’s an excellent candidate for a test case. It’s also easy to obtain and far safer to experiment with than actual ransomware—perfect if you’d like to try it yourself.
Note: If you feel uncomfortable with this topic, please refer to the OpenSecurityTraining2 mentioned course.
Delights and Pains of using Angr.
Angr is an entirely different beast compared to the emulators I’ve covered on this blog. To be honest, angr is more like a full-featured framework for analyzing binaries through symbolic execution. The angr documentation is well-structured and covers a wide range of topics in detail. However, fully grasping the documentation is no small feat—it’s far from easy.
I’ve spoken with several people who stay away from using angr because of its steep learning curve, and I have to agree—it can be challenging to get started.
To use angr effectively, there are a few key concepts you absolutely need to understand. These requirements are not so different from the prerequisites discussed earlier on this blog for working with emulators. However, with angr, you also need to thoroughly understand what symbolic execution is and how it works.
The most critical step, though, is setting up angr correctly—especially when you need to focus on a specific piece of code rather than running the entire binary from the beginning.
Having an idea of angr components and capabilities we could simplify its usage in two main cases:
- You need to symbolically execute the binary from scratch in order to understand which input could lead to a specific output. (Basic usage)
- You need to symbolically execute a function within the binary in order to understand the result of this function, setting up all the requirements (parameters) that are going to be used during the execution.
When you run a binary with angr, you’ll rely on these components to find a “solution” that meets your specific needs. This solution could take many forms—it might be identifying a bug in a program to report an error, or it could be something entirely different, such as uncovering a passphrase or a product key
💡 Before diving into our example, you might wonder: “How can I determine if this function, or my goal, is a good fit for angr?” This is a great question, but unfortunately, it doesn’t have a straightforward answer. Generally speaking, you can use angr whenever you’re faced with a question like: “What input would produce this specific output?” While this isn’t a complete guideline, I’ve found that this question often arises when I encounter problems well-suited for an angr-like solution. That said, you also need to carefully consider the function or binary you plan to analyze. Since emulation is inherently slow, working with angr can lead to exponentially increasing complexity and execution time, depending on the task.
My recommendation is to use angr for well-defined, specific tasks that align with the question above, rather than attempting to run it against the entire binary.
C4tbert Vs. Angr
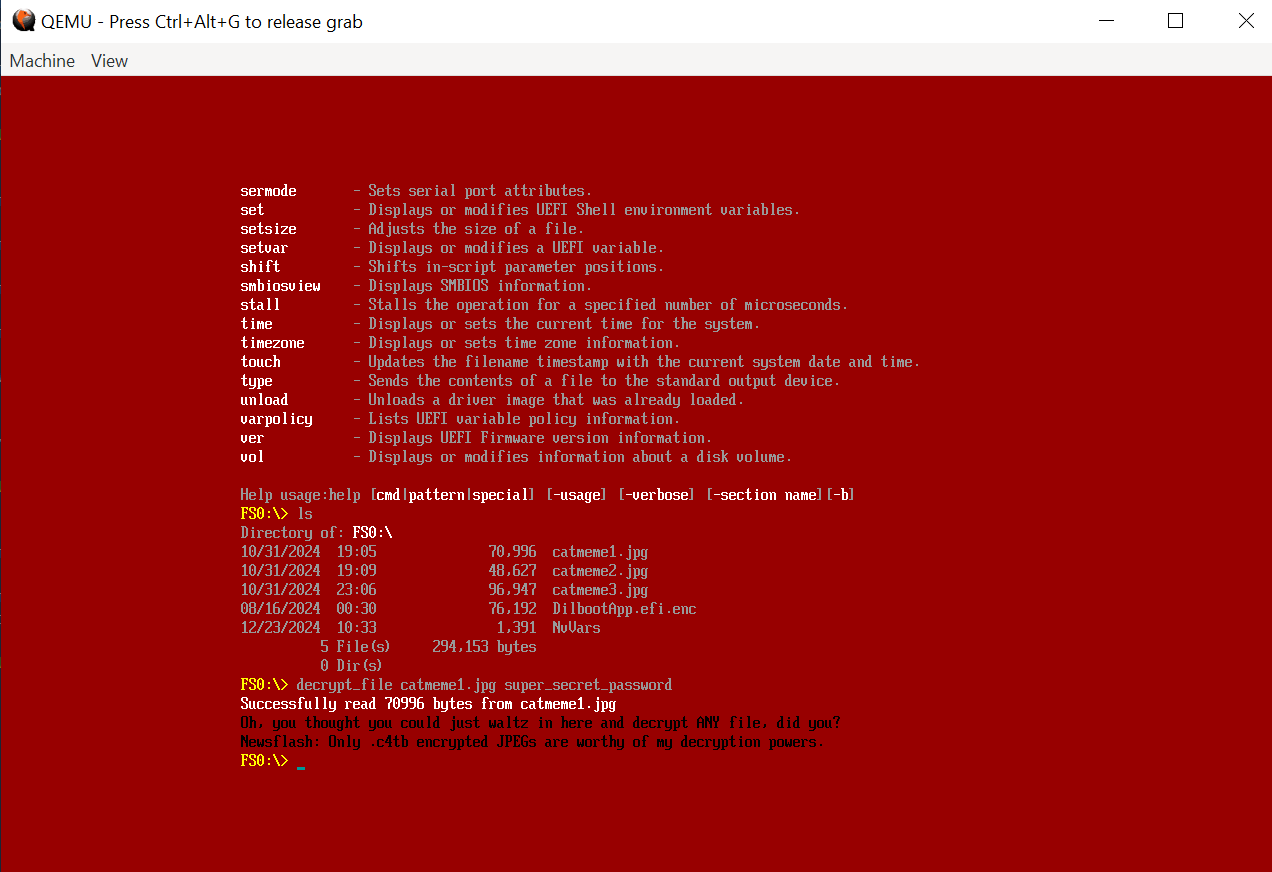
C4tbert is one of the most enjoyable challenges I’ve had the chance to tackle recently. It covers a variety of fascinating topics, including UEFI, cryptography, and virtual machines. In short, the goal is to find the correct passwords that will eventually decrypt files containing parts of the flag.

Figure 1: Catbert Ransomware - attempt to decrypt file with random password
Does this sound familiar? It aligns perfectly with the question we discussed earlier: “What input would produce this output?” To answer this question using angr, we first need to explore the code, develop a high-level understanding of the input and output parameters, and define all the necessary requirements.
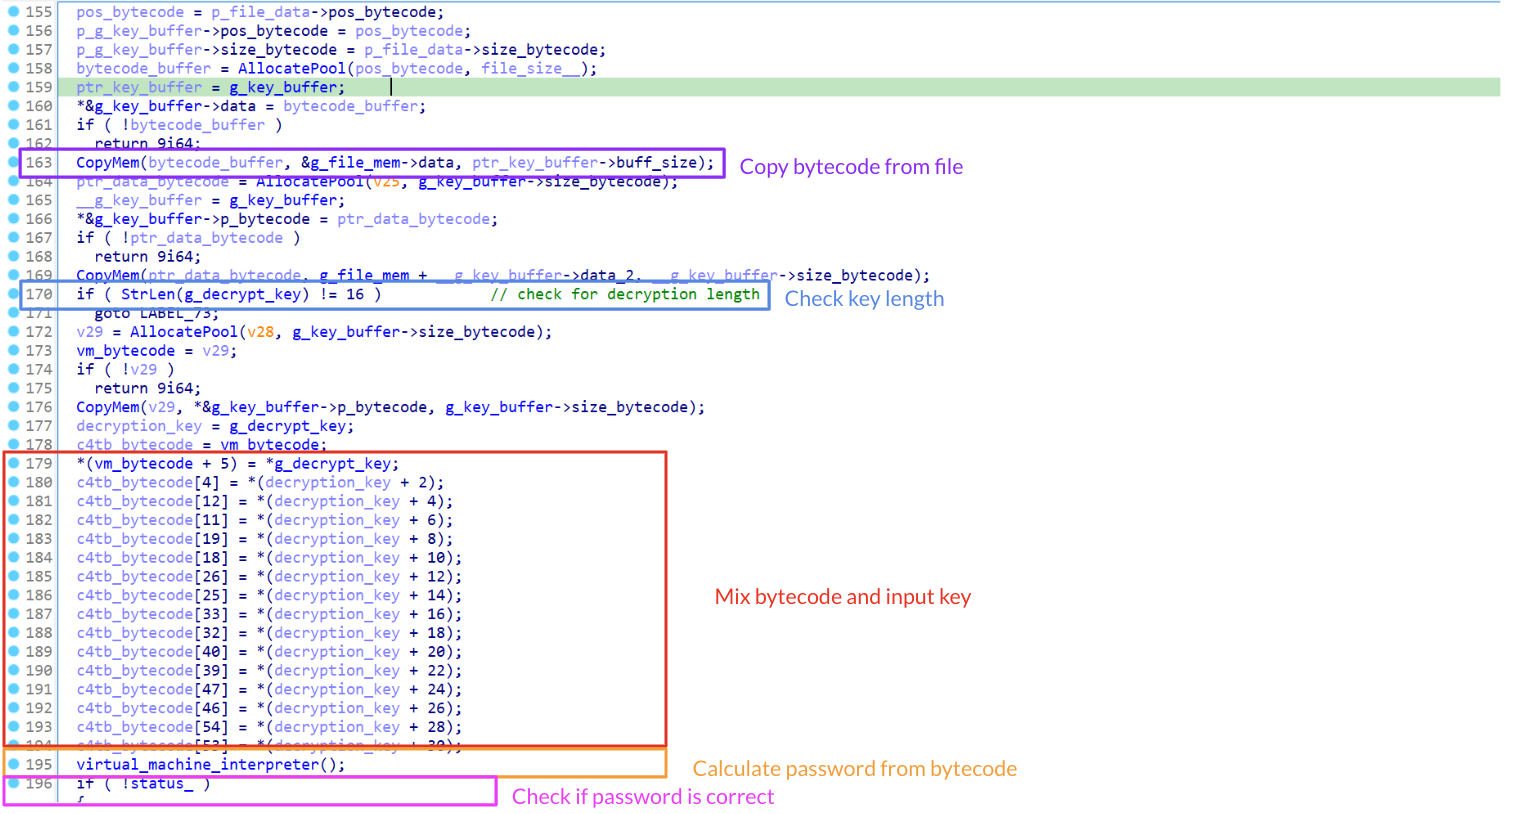
Let’s start reversing a bit the interesting part of the binary avoiding to look closer on the challenge itself, but let’s try to focus on angr requirements.

Figure 2: Decryption overview for angr requitements
💡 To make it easier to follow, I have renamed most of the code. So it will be also possible to use line number as a reference.
Looking at Figure 2, we can see that at line 170, the password is checked to ensure it is 16 characters long. Before this, a bytecode is retrieved from a file (line 163) and later manipulated slightly (lines 180–194) by substituting some of its characters with values derived from our input key. Finally, the bytecode is passed to a virtual_machine_interpreter for processing. Based on these observations, we can start taking notes of the requirements we’ve uncovered so far and translate them into practical actions we need to perform with angr:
- Bytecode: We need to allocate memory to hold the bytecode, which can be easily retrieved from the
.c4tbfile. - Password: This is the answer to our problem. We need to find a 16-character input that can successfully decrypt the file.
Additionally, we must keep in mind that the password is mixed into the bytecode during its processing by the bytecode interpreter function. With a more clear understanding of those points, we can now move on to exploring the virtual machine code, which represents the part of the program we will execute

Figure 3: Requirements for virtual_machine_interpreter function.
To determine the function’s requirements, we need to start our exploration from the very beginning. As we can see, the function involves a bytecode (which we’ve already noted), a status (representing the exit condition, as referenced in Figure 3), and a stack.
💡To keep things simple, I’ve referred to the additional memory needed in the function as a stack. You might ask, “How am I supposed to know that a stack is needed without analyzing the function?” Well, a stack is essentially just a block of memory. It’s called a stack because it’s typically accessed via a register pointing to it, but in general, we could call it anything we like. It’s important to note that I made this simplification to make the overall structure easier to understand. If you’re interested in reversing the code in detail, you’ll eventually discover that the virtual machine interpreter performs various operations on the stack, such as push, pop, rotate, and more.
To effectively use angr, especially in our case, it’s crucial to identify the correct address to begin execution. Fortunately, this is straightforward in this scenario, as it corresponds to the very first instruction of the virtual_machine_interpreter (line 16).
Another important aspect to consider when running an angr script are the find and avoid addresses. These special addresses represent success and failure conditions, respectively. However, instead of just specifying a simple address, you can also define a function to check the status variable in order to determine its value and any potential success condition. Looking at the code, we can easily see that if status equals 0, the program will follow the invalid key branch.
Now that we have a general understanding of the code, we can begin writing our angr script.
Writing angr script
Let’s start writing down the requirements that we have discovered.
#bytecode
data = list(f.read(size))

#key
key = [claripy.BVS(f'k{i}', 8) for i in range(16)]

# mixing input key bytes within the bytecode
data[5] = key[0]
data[4] = key[1]
data[12] = key[2]
data[11] = key[3]
data[19] = key[4]
data[18] = key[5]
data[26] = key[6]
data[25] = key[7]
data[33] = key[8]
data[32] = key[9]
data[40] = key[10]
data[39] = key[11]
data[47] = key[12]
data[46] = key[13]
data[54] = key[14]
data[53] = key[15]
The code above is fairly easy to understand. The data variable represents the bytes read from the .c4tb file, and the key is a bitvector that will hold our input.
💡 Angr’s solver engine, called Claripy, uses the syntax above to create a 16-byte array (or an array named ‘key’ with each cell being 8 bits). This assignment tells angr that the key array is our symbolic variable, which needs to be “concretized” to guess the correct decryption key. The subsequent mixing step simply assigns our key to the bytecode, which will then be interpreted.
Next, we need to define the parameters necessary for properly handling the operations related to the bytecode, the status variable, and the entry and return addresses of the function we intend to execute. With this information, we’ll be ready to create the project and state variables for the calling function.
RET_ADDR = # Return address of virtual_machine_interpreter function.
STATUS_ADDR = # Address of status variable
FUN_ENTRY_ADDR = # Address of the first instruction of virtual_machine_interpreter
DATA_PTR_ADDR = # Address that is storing the bytecode

proj = angr.Project('0.efi')
state = proj.factory.call_state(FUN_ENTRY_ADDR)
💡 As you can see, I’ve omitted the exact values for the addresses. This is because they depend on angr and where it loads the binary. Using specific addresses would be pointless for this tutorial, but for now, you can assume them to be correct. I’ll explain how to properly set them at the end of this section.
Now that everything should be clear so far, it’s time to tighten your seatbelt because we’re about to dive a bit deeper.
Up to this point, most of the requirements have been correctly defined. However, before moving forward, we need to allocate memory for our data. Keep in mind that the data variable contains the data extracted from the .c4tb file, but we haven’t assigned it to angr’s memory yet. Additionally, this assignment must be done correctly, matching the appropriate variable type.
Looking more closely at the bytecode and key assignment, we can see that we’re using the lower byte of the RAX register (specifically AL) each time. This means we need exactly 8 bits for each key value.

Figure 4: Shuffle bytecode and key chars
Armed with this knowledge, it is possible to allocate and assign angr memory accordingly.
data_sec = state.heap.allocate(size)
for i in range(size):
	# Each data of the bytecode is 1 byte long.
  state.mem[data_sec + i].uint8_t = data[i]
# For memory on 64bit architecture we need to use the right address size.
state.mem[DATA_PTR_ADDR].uint64_t = data_sec
At this point, there isn’t much left to do. We can now initialize the simulation manager and define our find and avoid parameters.
As mentioned earlier, we can use a function for our find parameter. In this case, this function will allow us to explore the value of the status variable, which will act as a switch to indicate whether we’ve provided the correct password.
simgr = proj.factory.simulation_manager(state)

#if I'm reaching the end of the function I need to check the status variable.
def found(state):
  if state.addr == RET_ADDR:
    status = state.memory.load(STATUS_ADDR, 8)
    # add a constraints to force status to be != from 0
    state.add_constraints(status != 0)
    # return a simple true or false, depending on status.
    return state.solver.satisfiable()

# define a found function that is going to check the status variable
simgr.explore(find=found)
# There is only a single solution.
assert len(simgr.found) == 1
state = simgr.found[0]
print(bytes((state.solver.eval(k) for k in key)))
Script Testing
Now that everything is properly set up, we can run our script and expect to receive the results within a reasonable timeframe. It shouldn’t take long—typically around 3 to 5 minutes, depending on your VM.

Figure 5: Testing angr script for catmeme1.jpg
💡I have automatically generated a few comments throughout the code to improve readability. Additionally, it’s worth noting that running the script for the third file requires some extra adjustments. However, the technical details of this specific case won’t be covered, as it relies on a challenge-specific scenario
Setting up the reference addresses properly
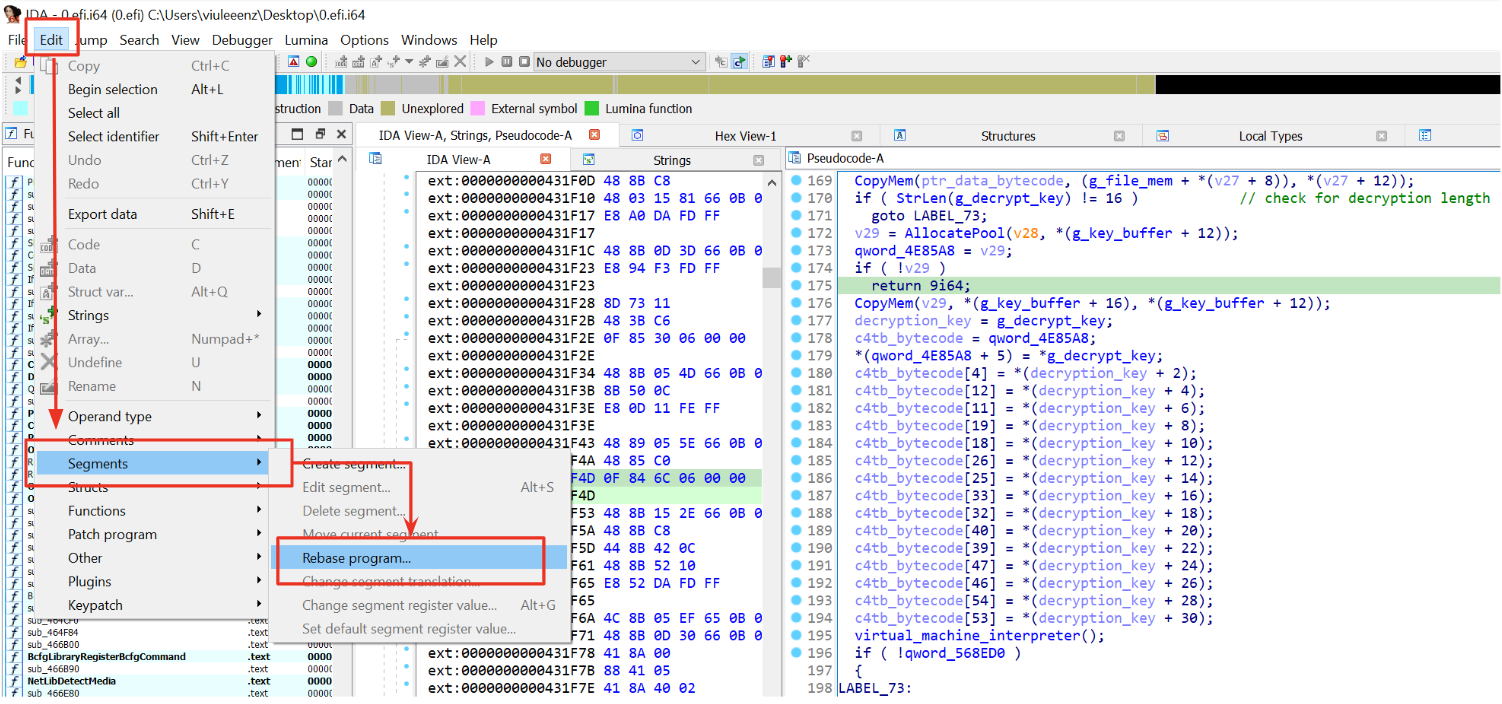
How do we set RET_ADDR, STATUS_ADDR, FUN_ENTRY_ADDR, and DATA_PTR_ADDR? When executing code, it’s crucial to align the addresses from the program with those in your disassembler or debugger if you want to track the program’s flow accurately. In this case, angr loads the program into specific memory addresses. To set these variables correctly, you can retrieve the addresses used by angr and rebase the binary in IDA accordingly. After initializing the project, you can print the base address used by angr to get this information.
base_addr = proj.loader.min_addr
print(hex(base_addr))
This is instruction actually prints the base address used by angr to load the binary. Matching this address in IDA will make all operation about addresses way more easier.

Figure 5: Rebase program with IDA
Conclusion
Through this post, I’ve “closed the circle” (or at least tried) on emulation and symbolic execution, demonstrating how these techniques can be used to analyze real-world malware. While there are still unexplored topic (e.g., Qiling), I haven’t delved into it deeply. Despite being a potentially powerful tool, Qiling’s documentation isn’t well-maintained, and utilizing it might require significant effort. Nevertheless, I hope you’ve enjoyed reading all the posts and had as much fun exploring them as I did while explaining and experimenting with these topics.
Recently, I’ve received a few messages asking why I stopped publishing on the blog. The truth is, most of my recent research has focused on very specific topics that might not appeal to a broad audience. Writing blog posts for such a niche can sometimes feel less beneficial for a general readership. So, what does the future hold?
I don’t want to stop publishing entirely, even though I’ve been a bit inconsistent lately. However, I’m still figuring out which topics could be interesting to explore in the coming months. I enjoy exploring new ideas and conducting independent research on malware analysis and classification. I usually try to align this blog with my research, both to clarify my own thoughts and to provide useful content for a wider audience.
At the moment, I have a few large projects under development that are keeping me quite busy. Still, I’m considering posting research-oriented content related to malware classification, possibly adopting a more formal, paper-oriented format (which I’d include in the whitepapers section). As for the future, it remains uncertain. As the saying goes, “The best way to predict the future is to create it.” I’ll continue exploring, experimenting, and sharing whenever inspiration strikes or a project feels worth sharing.
Thank you for reading, and as always, keep reversing and have fun!
References
2663 Words
2024-12-27 01:00