12 minutes
Rapid-Deployable Cloud Malware Analysis Lab on AWS
Every time I changed laptops I found myself rebuilding the same malware analysis environment from scratch. Local VMs worked well enough until they didn’t: snapshots became stale, the host machine slowed down, and after a few months I was no longer entirely sure whether the environment was still clean. Moving to an Apple Silicon Mac finally forced me to rethink the entire workflow. Rather than fighting emulation layers or maintaining increasingly heavy local VMs, I decided to move the analysis environment into AWS.
This guide walks through building a repeatable, disposable malware analysis lab using Terraform and FlareVM. By the end, a fresh analysis machine is only a terraform apply away, and cleaning it up takes a single terraform destroy.
The setup described here builds upon the original adanalvarez/AWS-malware-lab repository, with several practical adjustments, simplifications, and lessons learned during real-world usage.
💡 What follows is not a replacement for the original project. Instead, it documents my own experience building and adapting the lab for day-to-day malware analysis, particularly from an Apple Silicon Mac where running x86 or x64 analysis environments locally quickly becomes frustrating.
Why a Cloud Lab?
Before diving into the setup, it is worth understanding why this approach is worth the upfront investment.
Isolation: Cloud instances are ephemeral by design and when you run terraform destroy, every trace of the instance is gone. If something goes wrong, you destroy and rebuild from a clean AMI in minutes.
Repeatable: A local VM gets dirty over time. You install a tool, test something, forget to revert, and after a few weeks your “clean” baseline is anything but. With an AMI-backed cloud lab, every terraform apply is a guaranteed fresh start from the same known-good snapshot.
Cost: A t3.medium FlareVM instance costs roughly $0.09/hour in eu-*-*. If you analyze malware for few hours a week, you are spending less than $5.00. The AMI snapshot storage (60 GB) runs about $3/month even when everything is destroyed. That is the only ongoing cost when the lab is idle.
ARM Mac users have no real alternative for x86 analysis. Tools like x32dbg, PE-bear, and many Windows-native analysis utilities simply do not run on ARM without emulation layers that introduce their own complexity. A cloud x86_64 Windows instance gives you the real environment with no compromise.
💡 One thing to be aware of upfront: AWS requires you to submit a Simulated Events form before detonating malware on their infrastructure. This is not optional. AWS monitors for malicious outbound traffic and will flag or suspend accounts that generate it without prior authorization. Fill out the form at
https://console.aws.amazon.com/support/contacts#/simulated-eventsbefore you start running samples. It takes about five minutes and is worth doing early so approval is in place by the time you need it.
Architecture Overview
The lab mentioned in Alvarez repository supports two configurations. This guide focuses on the simpler one, which is appropriate for most analysis workflows.
Internet-connected configuration (what we are building): A single FlareVM Windows instance with a public IP. Malware can reach the real internet from this instance. It is useful when you want to observe live C2 traffic, DNS resolution, or download behaviour.
Isolated configuration (not covered here): Two instances. A FlareVM on a private subnet with no internet access, and Apache Guacamole as a browser-based jump-box. File transfer into FlareVM uses an SFTP server. There is also an optional INetSim instance that simulates internet services (DNS, HTTP, FTP) locally. It is useful when you want malware to believe it has internet access without actually giving it any.
Prerequisites
Before touching AWS, make sure the following are in place on your Mac.
Homebrew
If you do not have it yet:
/bin/bash -c "$(curl -fsSL https://raw.githubusercontent.com/Homebrew/install/HEAD/install.sh)"
Terraform & AWSCli
Terraform was removed from homebrew-core due to a licensing change. It now lives in HashiCorp’s own tap:
brew tap hashicorp/tap
brew install hashicorp/tap/terraform
brew install awscli
💡 Do not try
brew install terraformdirectly, it will not find the right package and will suggest unrelated tools liketerraformerorterraform-ls. Always use thehashicorp/taptap.
AWS Setup
Create an IAM User for Terraform
Terraform needs programmatic access to AWS to create and destroy resources. The correct approach is a dedicated IAM user.
https://console.aws.amazon.com/iam/

Figure 1: Creating AWS user
- Users > Create user
- Name it as you prefer (e.g.,
terraform-malware-lab) - Leave “Provide user access to the AWS Management Console” unchecked
- On the permissions page, choose “Attach policies directly” and attach
AmazonEC2FullAccess - Finish creating the user, then click into it and go to the Security credentials tab
- Create access key > Command Line Interface (CLI) > create it
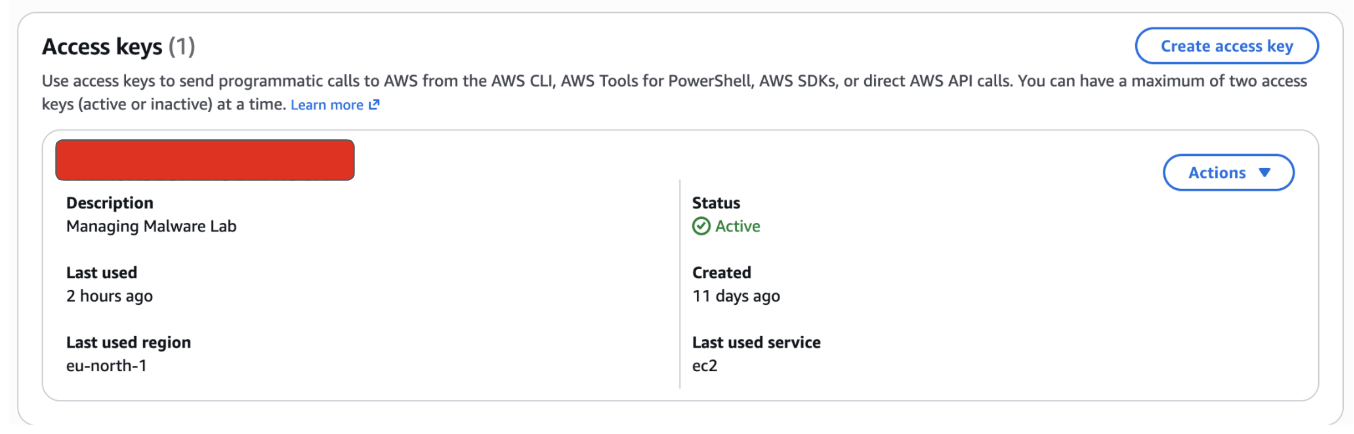
Figure 2: Create Access Key for AWS CLI
Copy the Access Key ID and Secret Access Key (the secret is only shown once)
Configure the AWS CLI
aws configure
When prompted:
AWS Access Key ID: [your access key ID]
AWS Secret Access Key: [your secret access key]
Default region name: eu-north-1
Default output format: json
💡 The region you enter here is critical and will cause a cascade of errors if it is wrong. After configuring, always verify with:
aws configure get region
aws sts get-caller-identity
The first command should return your region exactly. The second should return your account ID and the ARN of your terraform user. If either is wrong, run
aws configureagain and correct it before proceeding.
Phase 1: Building the Base FlareVM AMI
This is the only manual phase. You do it once, turn the result into a reusable AMI, and Terraform handles everything from there.
Create an EC2 Key Pair
Before launching the instance, you need a key pair. In AWS, a key pair is a standard RSA keypair split across two parties:
- AWS stores the public key: it is injected into every instance you launch with that key pair;
- Keep the private key: downloaded once as a
.pemfile and never retrievable again from AWS
For Windows instances specifically, the key pair is not used for SSH. Instead, AWS uses it to encrypt the Windows Administrator password at instance launch. To read that password, you upload your .pem file in the EC2 console and AWS decrypts it for you. This is a one-time step, after you create the AMI, the same password remains valid for every instance launched from it.
One critical detail: key pairs are region-specific. A key pair created in eu-west-3 does not exist in eu-north-1. If you ever deploy Terraform in a different region, you will need to register the key pair there too.
To create the key pair:
- Go to EC2 > Key Pairs (under Network & Security in the left sidebar)
- Click Create key pair and give it a name (e.g,
flarevm-key) - Key pair type: RSA
- Private key file format:
.pem - Create key pair and the
.pemfile downloads automatically
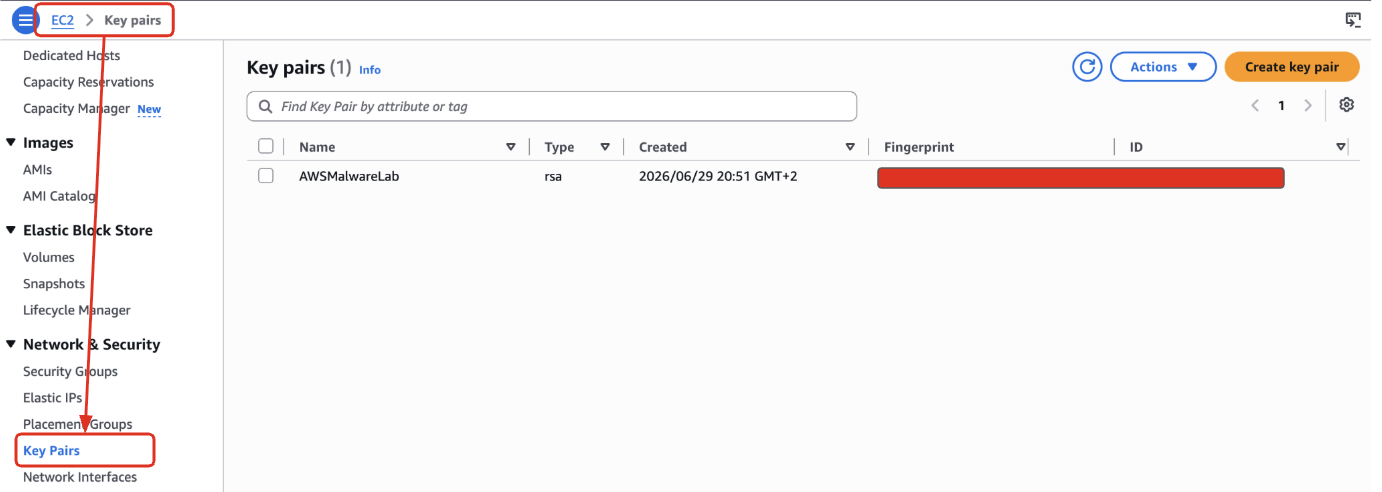
Figure 3: Creating Key pairs for accessing AWS machine.
Move it somewhere permanent and lock down its permissions:
mv ~/Downloads/flarevm-key.pem ~/.ssh/
chmod 400 ~/.ssh/flarevm-key.pem
💡 If you lose the
.pemfile there is no recovery. AWS never stored the private key. You would need to create a new key pair and update any Terraform config that references the old name.
Launch the Windows Instance
In the EC2 console, click Launch instance and configure as follows:
- Name:
flarevm-base - AMI: Search for and select Windows Server 2022 Base
- Instance type:
t2.medium(sufficient for the FlareVM install) - Key pair: Select the key pair you just created (
flarevm-key) - Network settings (click Edit):
- Confirm a public subnet is selected
- Auto-assign public IP: Enable
- Security group: allow RDP (port 3389) with source set to My IP
- Storage: Increase the root volume to 60 GB.
- Launch instance.
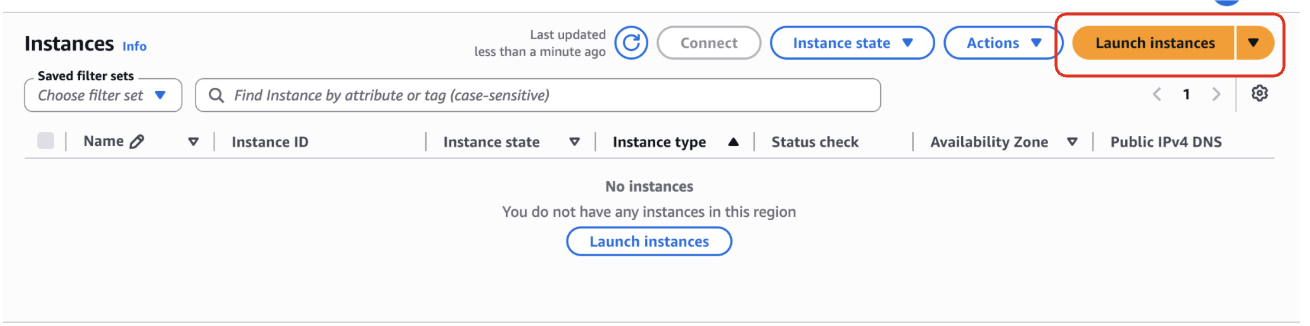
Figure 4: Create your EC2 machine lab.
💡 If your home connection uses a dynamic IP, the security group will become stale after a reconnection or ISP lease renewal. When this happens, RDP will silently fail to connect. To fix it: EC2 > Security Groups > select your group > Inbound rules > Edit > update the RDP source to “My IP” again. AWS auto-fills your current IP when you select that option.
Get the Administrator Password
Wait for the instance to show “Running” and pass status checks before doing the following actions:
- Select the instance > Connect > RDP client tab
- Click Get password > upload your
.pemfile > Decrypt password - Copy and save the decrypted password ( this is the only time you can retrieve it this way). Once you convert this instance into an AMI, the password recovery method no longer works, but the password itself remains valid for all future instances launched from that AMI.
- Note the Public IPv4 address from the instance details page.
Connect via RDP and Install FlareVM
Once inside the Windows desktop, open the browser and download the FlareVM and make sure to follow all requirements before installing the actual Flare instance:
https://github.com/mandiant/flare-vm/blob/master/install.ps1
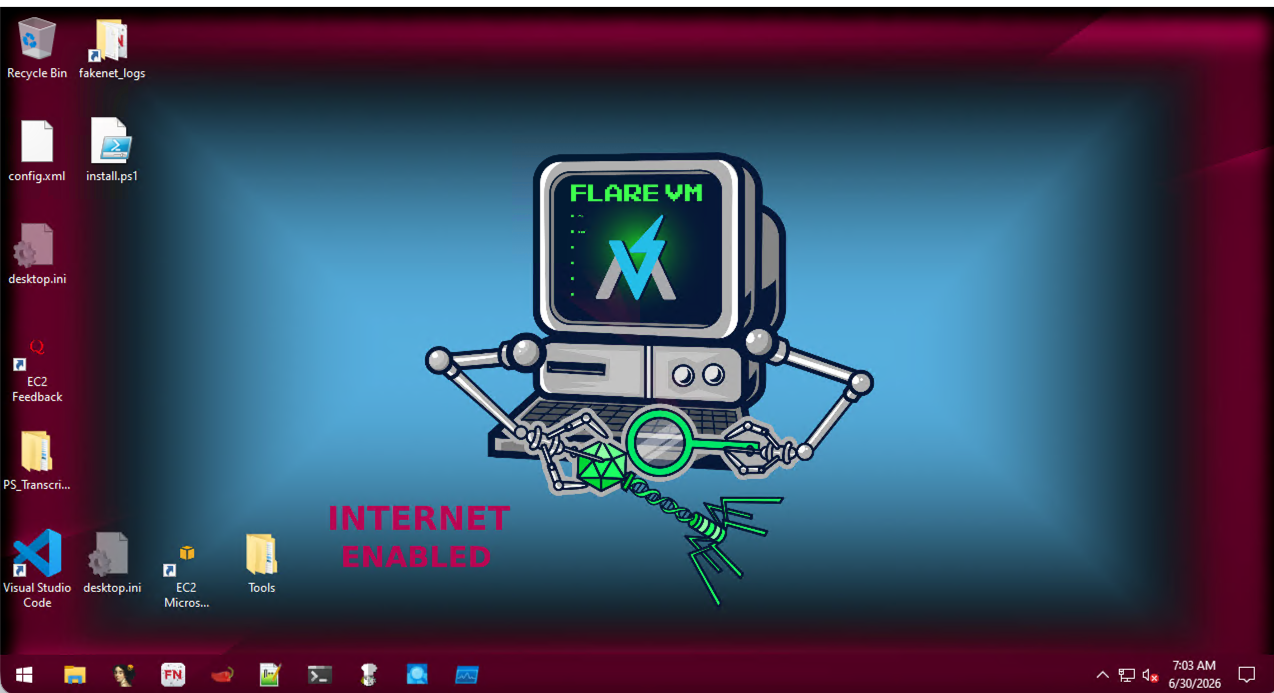
Figure 5: FlareVM Installed
Create the AMI
Once FlareVM finishes installing and everything looks correct on the desktop, do not close the RDP session yet. Go to the EC2 console and stop the instance. To take a snapshot its necessary that the machine is fully stopped.
Once stopped:
- Select the instance > Actions > Image and templates > Create image
- Name it
flarevm-base-v1 - Leave storage settings as-is (60 GB)
- For tags, choose “Tag image and snapshots together”
- Click Create image
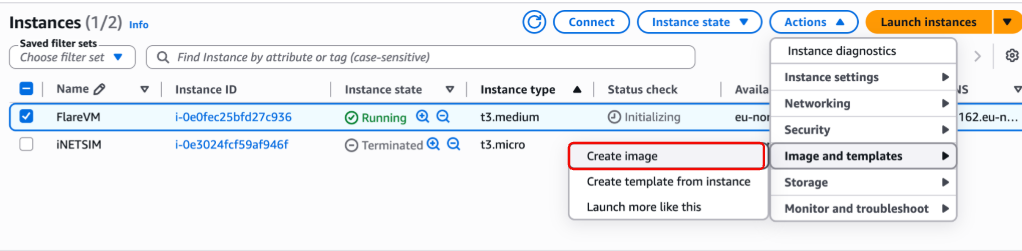
Figure 6: Creating the AMI snapshot.
Go to EC2 > AMIs and wait for the status to change from “pending” to “available” and Copy the AMI ID (looks like ami-0xxxxxxxxxxxxxxxxx). you will need it in the next phase.
💡 The AMI is a complete disk snapshot of your configured Windows instance. Once it shows “available”, it is fully independent of the original instance, you can terminate that instance and the AMI remains. This is the key distinction between Stop (pauses, keeps disk, costs a little) and Terminate (permanently deletes everything). Terminate the original instance only after the AMI is available.
Terminate the Original Instance
With the AMI available, the original instance has served its purpose. Terminate it:
- EC2 > Instances > select
flarevm-base> Instance state > Terminate (You will now only pay for the AMI snapshot storage).
Phase 2: Terraform Setup
The Terraform configuration for this lab is available as a ready-to-use repository to my git.
Pre-flight check
Before doing anything, verify your AWS CLI is pointing at the right region:
aws configure get region     # must return your intended region, e.g. eu-north-1
aws sts get-caller-identity  # must return your account ID and terraform user ARN
💡 Most errors that can derail this setup trace back to a single root cause: the AWS CLI pointing at the wrong region. If the CLI is wrong, the AMI lands in the wrong region and Terraform tries to use it somewhere it does not exist. Thirty seconds of verification here prevents hours of debugging, trust me 😫.
Clone and configure
git clone https://github.com/Viuleeenz/Reversing_Notes/tree/main/CloudMalwareLab/flarevm-minimal
cd flarevm-minimal
Create a terraform.tfvars file with your values:
region           = "eu-north-1"
ami              = "ami-0xxxxxxxxxxxxxxxxx"  # your AMI ID from Phase 1
key_name         = "flarevm-key"             # the key pair name you created earlier
allowed_rdp_cidr = "x.x.x.x/32"             # your IP
💡
allowed_rdp_cidrcontrols who can reach RDP. Lock it to your current IP ("x.x.x.x/32"), leaving it as0.0.0.0/0means anyone on the internet can attempt a connection, with only the Administrator password standing between them and your instance.
Initialize and apply
terraform init    # downloads the AWS provider plugin (run once per project)
terraform plan    # previews what will be created and nothing is touched
terraform apply   # creates everything and asks for confirmation before proceeding
terraform plan is worth reading before every apply. It shows exactly what will be created, modified, or destroyed. When apply asks for confirmation, type yes.
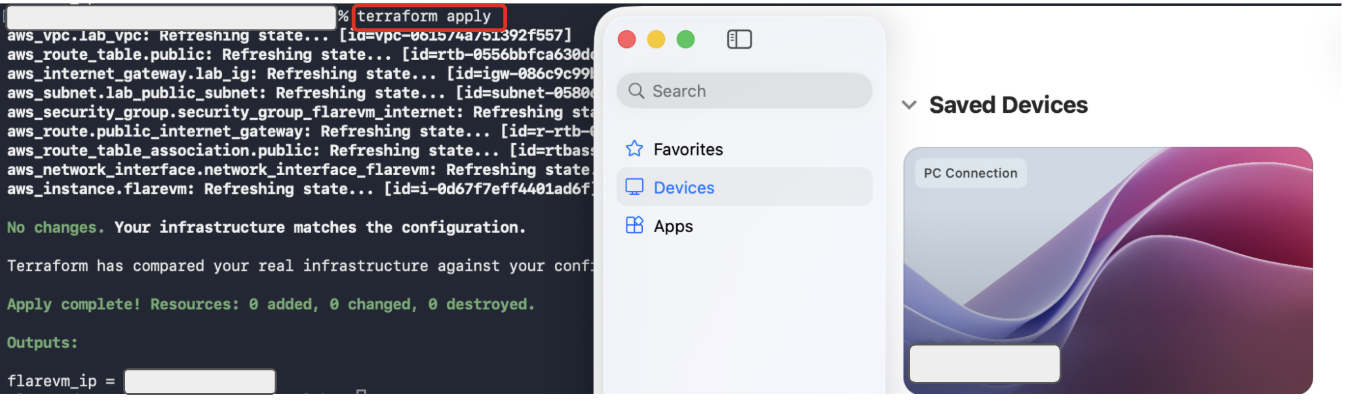
Figure 7: FlareVM correctly instantiated through Terraform
After a minute or two, Terraform outputs the public IP of your FlareVM instance:
flarevm_public_ip = "x.x.x.x"
Connect via RDP
Open Microsoft Remote Desktop and create a new connection:
- PC name: the IP from the Terraform output
- Username:
Administrator - Password: the password you saved in Phase 1.
💡 Every
terraform destroyfollowed byterraform applycreates a new instance with a new public IP. Update the PC name in your saved RDP connection each time. Runningterraform outputat any time prints the current IP without changing anything.
Day-to-Day Usage
A typical session looks like this:
terraform apply- Connect through RDP.
- Copy the sample into the machine.
- Run Procmon, Wireshark and the usual tooling.
- Collect artifacts and IOCs.
- Export results.
terraform destroy
The machine disappears completely and the next session starts from exactly the same baseline.
Update the Base Image
When you want to bake new tools or configuration changes into the AMI:
terraform applyto spin up a fresh instance- RDP in and make your changes
- Stop the instance (EC2 > Instance state > Stop)
- Create a new AMI (Actions > Image and templates > Create image), name it
flarevm-base-v2 - Update the
amivalue interraform.tfvarsto the new AMI ID - Delete the old AMI: EC2 > AMIs > select old AMI > Actions > Deregister AMI, then EC2 > Snapshots > delete the associated snapshot
💡 Deregistering an AMI does not automatically delete its underlying EBS snapshot. If you skip the snapshot deletion step, you will keep paying for it. Always clean up both the AMI and the snapshot together when rotating to a new version.
Conclusion
Local malware labs slowly accumulate history. Old tools, forgotten snapshots, temporary fixes, and unfinished experiments eventually become part of the environment itself. At some point it becomes difficult to know whether strange behaviour comes from the malware or from the machine. The biggest advantage of this setup isn’t speed or even cost. It’s confidence. Every analysis session begins from the same known-good image, and every session ends with the machine disappearing completely. For analysts on Apple Silicon, this has become the most practical way to keep a full Windows analysis environment around without fighting emulation layers or babysitting an ever-growing local VM. After the initial setup, the entire lifecycle of the lab becomes two commands.
No more wondering if last week’s sample left something behind. No more “is this VM still clean” before a new engagement starts.
It’s also one less thing to worry about when Flare-On season rolls around again 🤫
Hope this saves someone else the same laptop-migration headache that started this whole thing. Thanks for reading!
References
Minimal Terraform Setup:
- flarevm-terraform-setup - Reversing Notes repo.
Original Project:
- adanalvarez/AWS-malware-lab - original Terraform lab repository (supports Guacamole and INetSim configurations)
Tooling:
- mandiant/flare-vm - FlareVM installer
AWS Requirements:
- AWS Simulated Events form - required before detonating malware on EC2
2435 Words
2026-06-30 02:00