7 minutes
Extracting DDosia targets from process memory
Introduction
This post is part of an analysis that I have carried out during my spare time, motivated by a friend that asked me to have a look at the DDosia project related to the NoName057(16) group. The reason behind this request was caused by DDosia client changes for performing the DDos attacks. Because of that, all procedures used so far for monitoring NoName057(16) activities did not work anymore.
Before starting to reverse DDosia Windows sample, I preferred to gather as much information as possible about NoName057(16) TTPs and a few references to their samples.
Avast wrote a very detailed article about that project and described thoroughly all changes observed in the last few months. Because of that, before proceeding with this post, If you feel you are missing something, I strongly recommend that you read their article.
Client Setup
According to the information retrieved from the Telegram channel of DDosia Project, there are a couple of requirements before executing the client. The very first action is to create your id through a dedicated bot that will be used later on for authentication purposes. After that, it’s necessary to put the client_id.txt file (generated from DDosia bot) and the executable file in the same folder. If everything has been done properly, it should be possible to observe that authentication process will be done correctly and the client is going to download targets from its server:
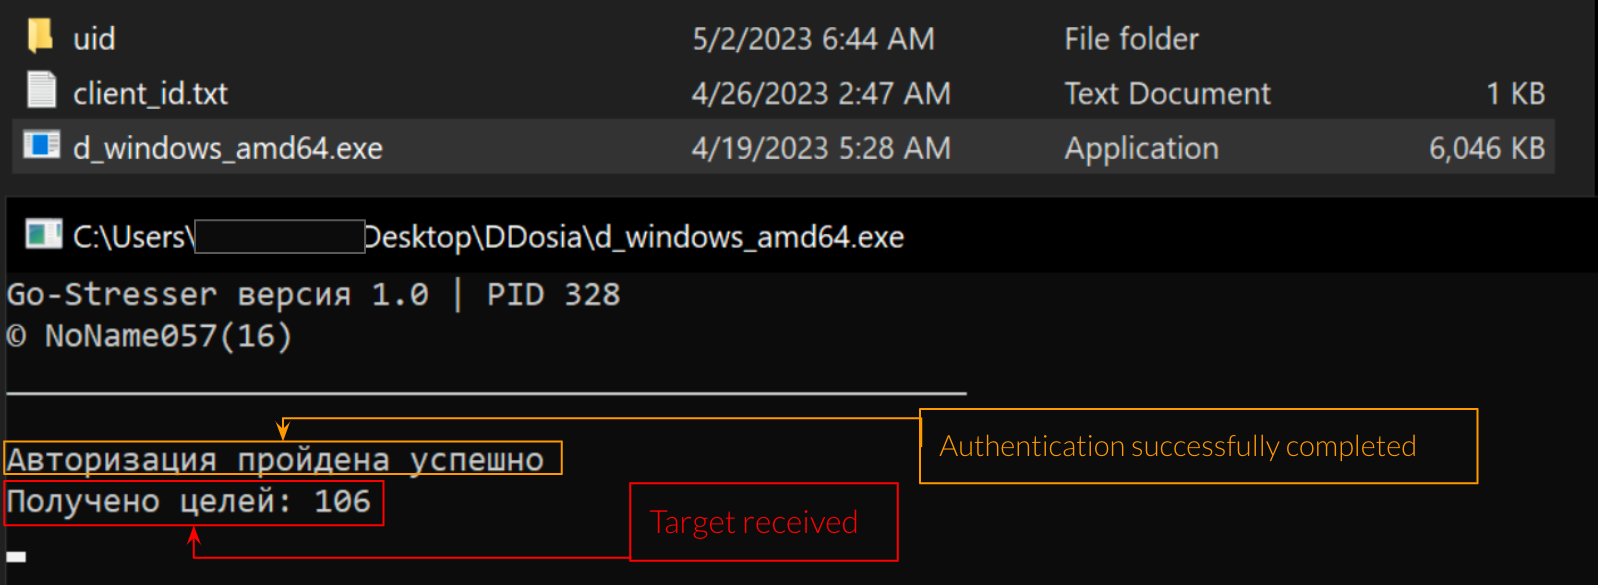
Figure 1: Client authenticated correctly
Dynamic analysis and process memory inspection
Here we are with the fun part. Because of the issues of analyzing GO binaries statically, I preferred to use a dynamic approach supported by Cape sandbox. In fact, executing the client with Cape it was possible to gather behavioral information to speed up our analysis (ref). Since the executable is going to be used for DDoS attacks, it’s easy to expect that most of the functions are related to network routines. One of the most interesting WindowsAPI refers to WSAStartup. This is interesting for us, because according to Microsoft documentation, it must be the first function to be used in order to retrieve socket implementation for further network operations:
The WSAStartup function must be the first Windows Sockets function called by an application or DLL. It allows an application or DLL to specify the version of Windows Sockets required and retrieve details of the specific Windows Sockets implementation. The application or DLL can only issue further Windows Sockets functions after successfully calling WSAStartup.
Moreover, starting to monitor network requests with Wireshark, give us additional information about client-server interactions and targets retrieving procedure:
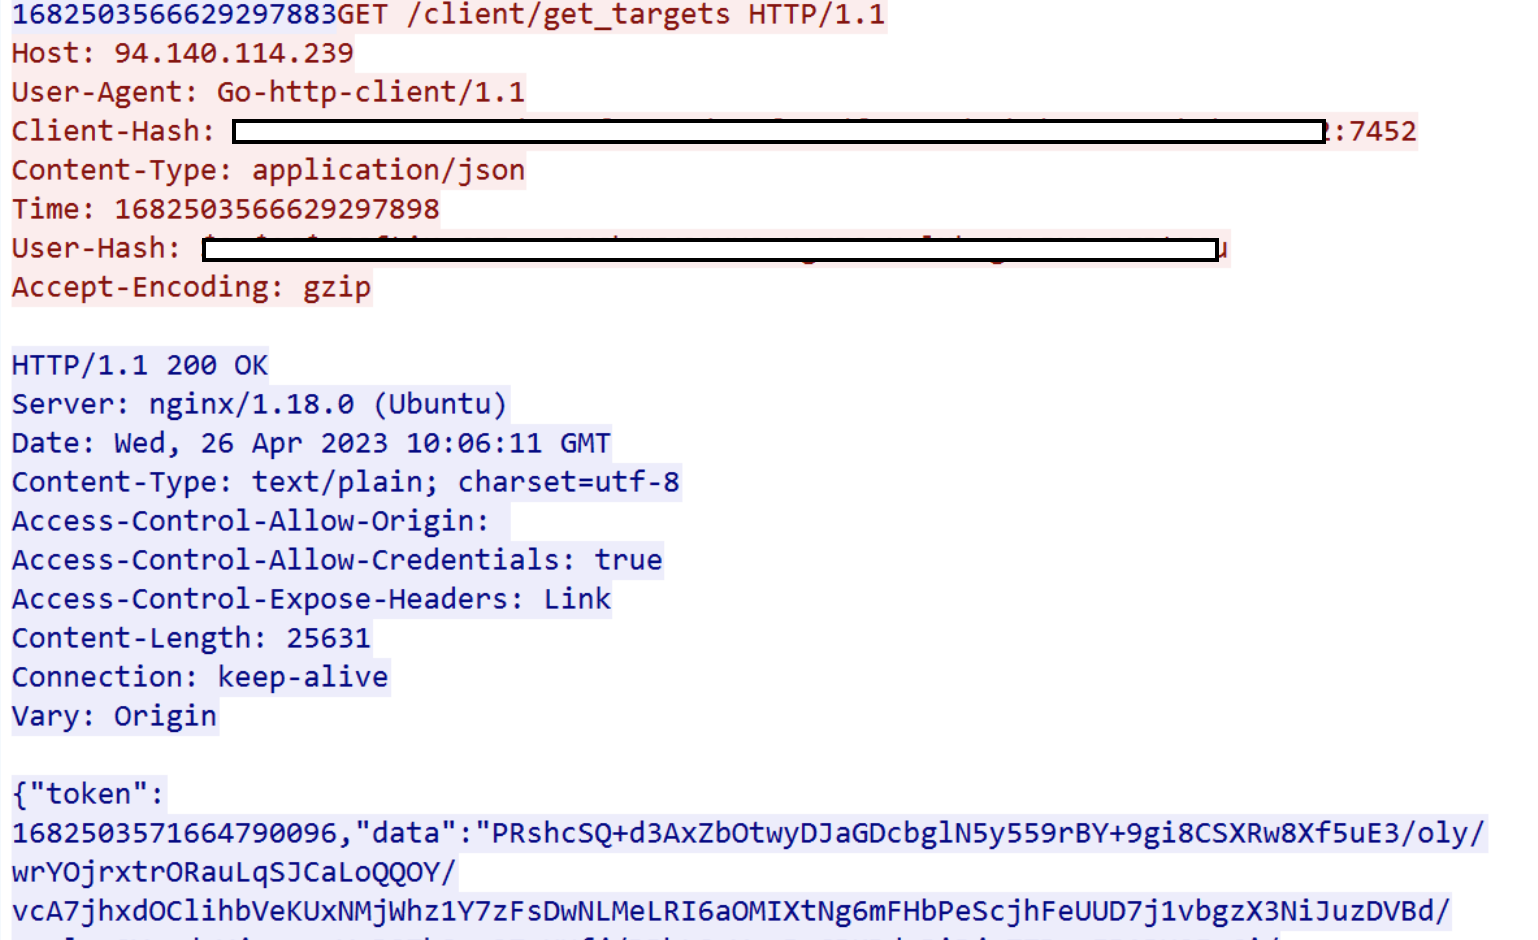
Figure 2 - Request for target list
As already mentioned on Avast blogspot, the target list is encrypted and retrieved after the authentication process. However, performing DDoS attacks requires a decryption routine to make targets in cleartext and forward them to a proper procedure. With this insight, it’s possible to open up a debugger and set a breakpoint of WSAStartup and start exploring the process flow from that point.

Figure 3 - Exploring DDosia executable control flow
Exploring the process execution, it’s possible to observe that WSAStartup API is called two times before starting the attack. The first one has been used from the main thread to perform the authentication process on the server side, instead the second call will be done right after retrieving the target file and it will be used from another thread to start the attack phase. Since that information we are looking for has been already downloaded and hopefully decrypted (at the time of the second call) we could explore the process memory trying to identify our target list.
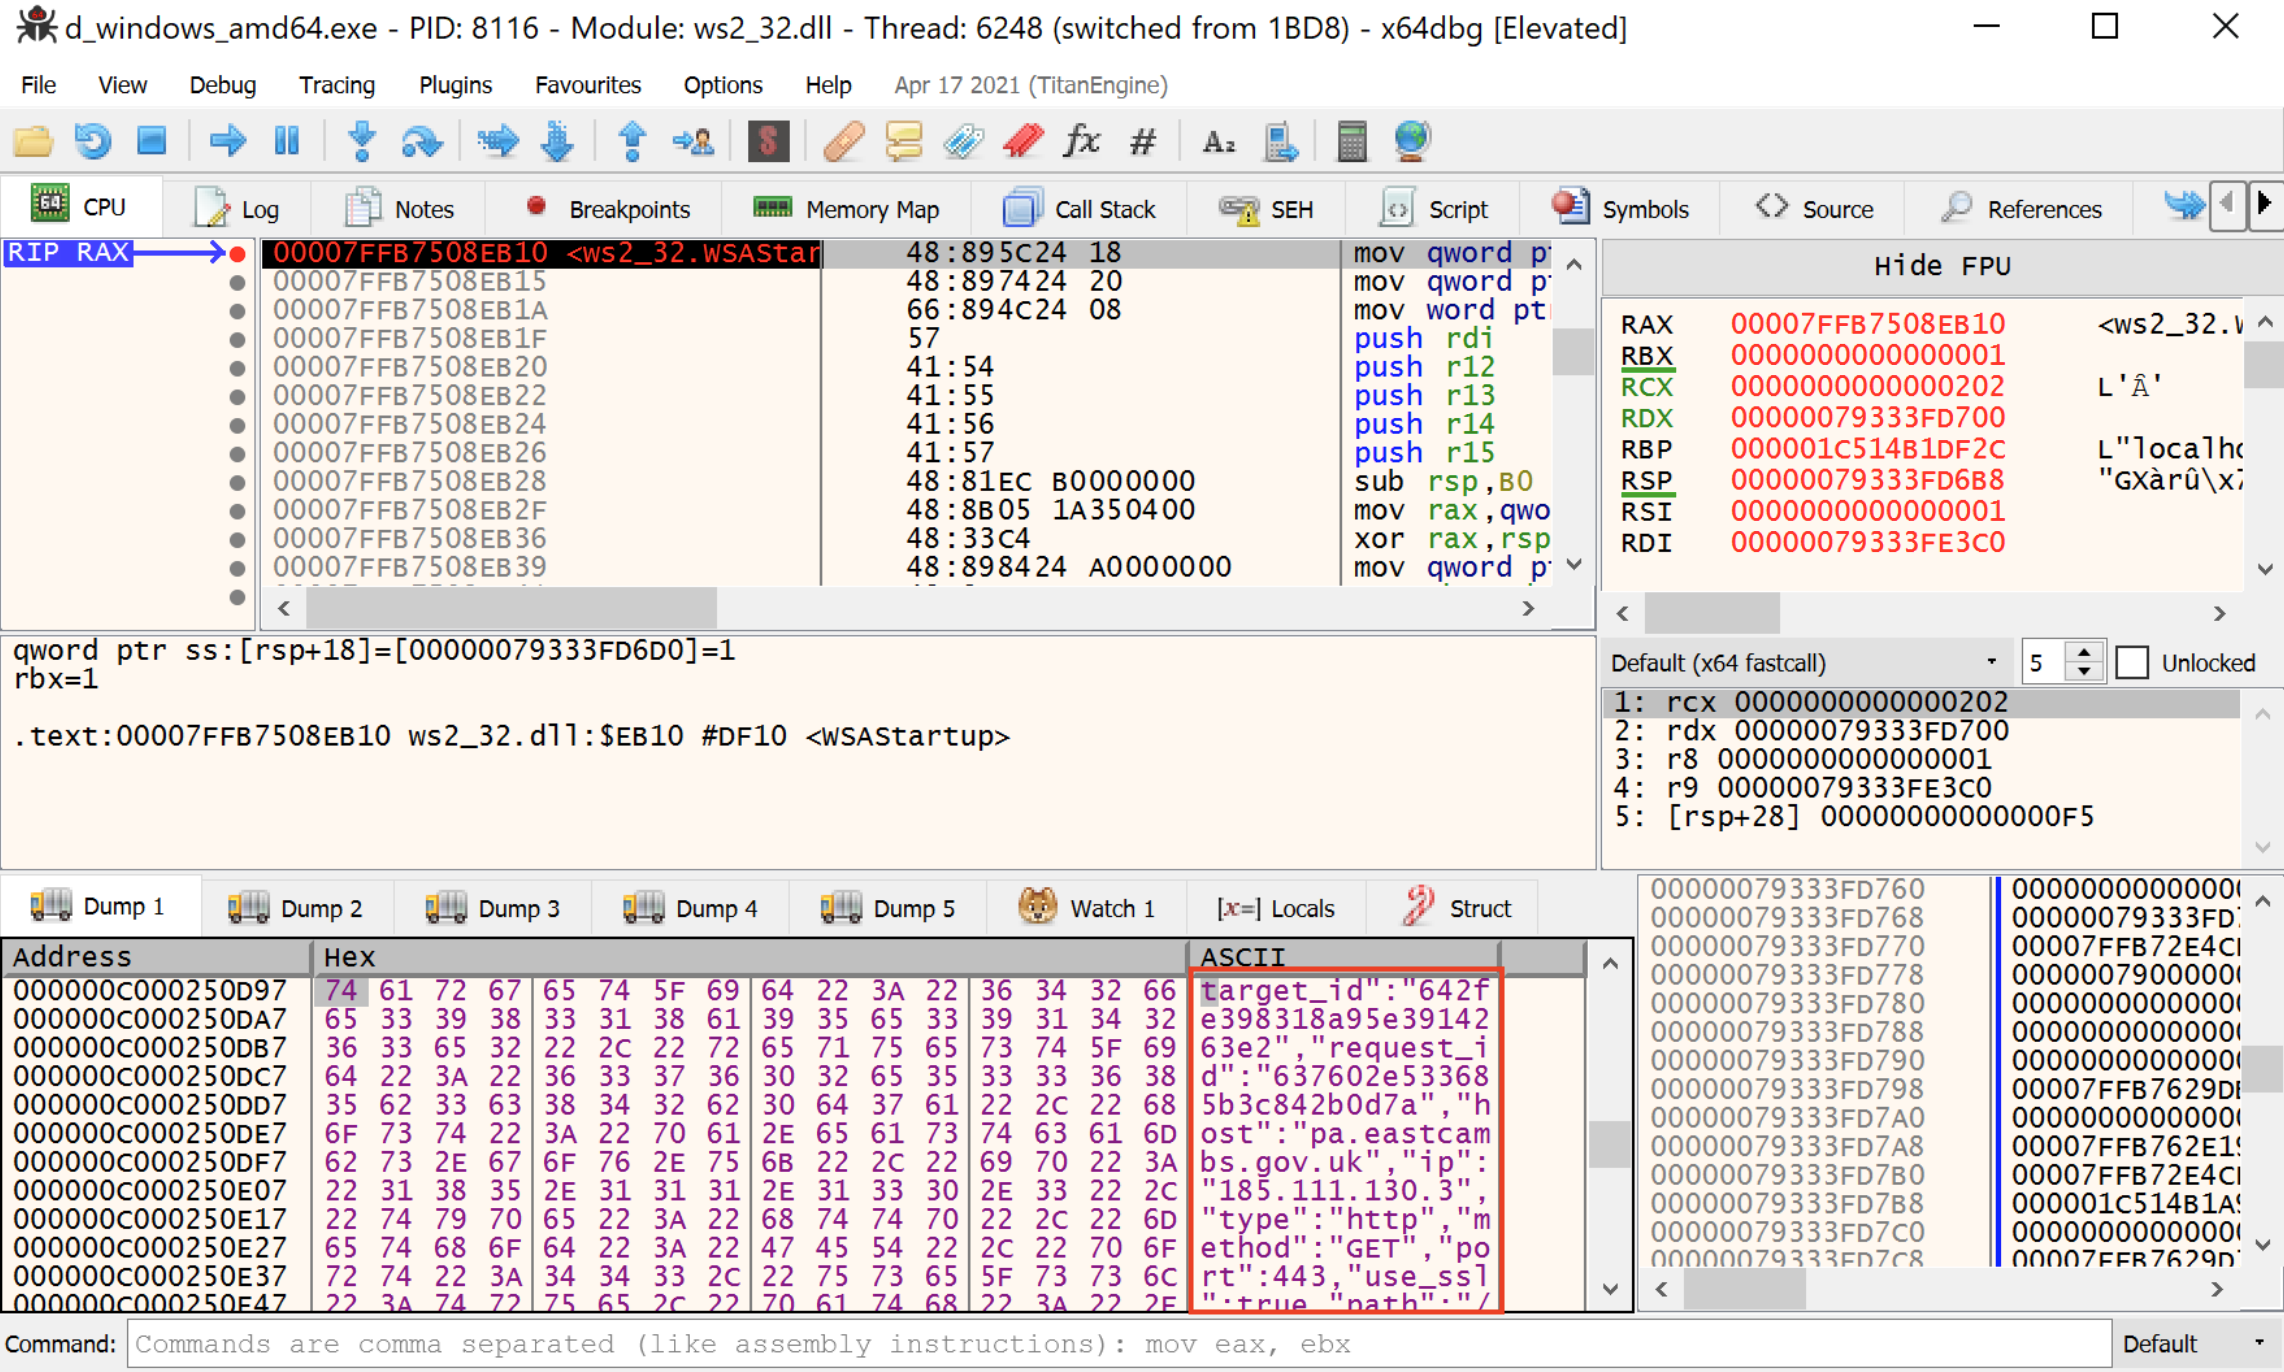 Figure 4 - Target stored in cleartext within process memory
As we expected, information is actually decrypted right before being used from threads that are in charge to flood the targets. From the cleartext sample, it’s also possible to reconstruct the original json file structure that follow this format:
{"target_id":"435te3af574b95e395847362","request_id":"23cer8c5mmp4434dlad53f2s","host":"www.tartuhly.ee","ip":"90.190.99.85","type":"http","method":"GET","port":443,"use_ssl":true,"path":"/otsi/$_1","body":{"type":"","value":""},"headers":null}
At this point I have shown all procedures to quickly follow the execution flow until the decryption routine is called. From now on, it’s just a matter of looking for those data within process memory and extracting them for your own purpose. It’s worth noting that information won’t be stored decrypted forever, in fact, as the executable keeps running, the json file is actually mangled in a way that is not easy to resemble it properly.
A little bit of automation
Even if the analysis has been completed and targets are correctly retrieved, I thought that giving a little tool to extract that information would be useful. Instead of doing complex stuff, I wrote two simple scripts called targets.js and recover.py. The purpose of these two files is to allow analysts from different backgrounds to extract those targets, even performing a simple memory dump. Probably there are easier and smarter techniques out there, but it was also a good chance to put in practice DBI, which I have already covered in a previous post.
target.js: Frida script that aims to get a memory dump after the WSAStartup has been called for the second time (when payloads are in cleartext in memory).
recover.py: it’s a simple python script that retrieves structured information from the files dumped. It’s worth noting that I limited my script to look for structured information, retrieving IP and Hostname (additional improvements are left to user’s needs).
Script Testing
In order to run the mentioned scripts there are two requirements to fulfill:
- Installing frida-tool (pip install frida-tools).
- Create a folder named “dumps” in the same place where you run the target.js file.
If all requirements are satisfied it’s just a matter of running those scripts and getting the results. The first step is to run frida.exe, using the targets.js file that contains all the information to dump the process memory:
frida.exe <ddosia_client.exe> -l targets.js
If everything has been done correctly (please keep in mind the requirements), you should be able to see a message “[END] Memory dumped correctly” in your console.
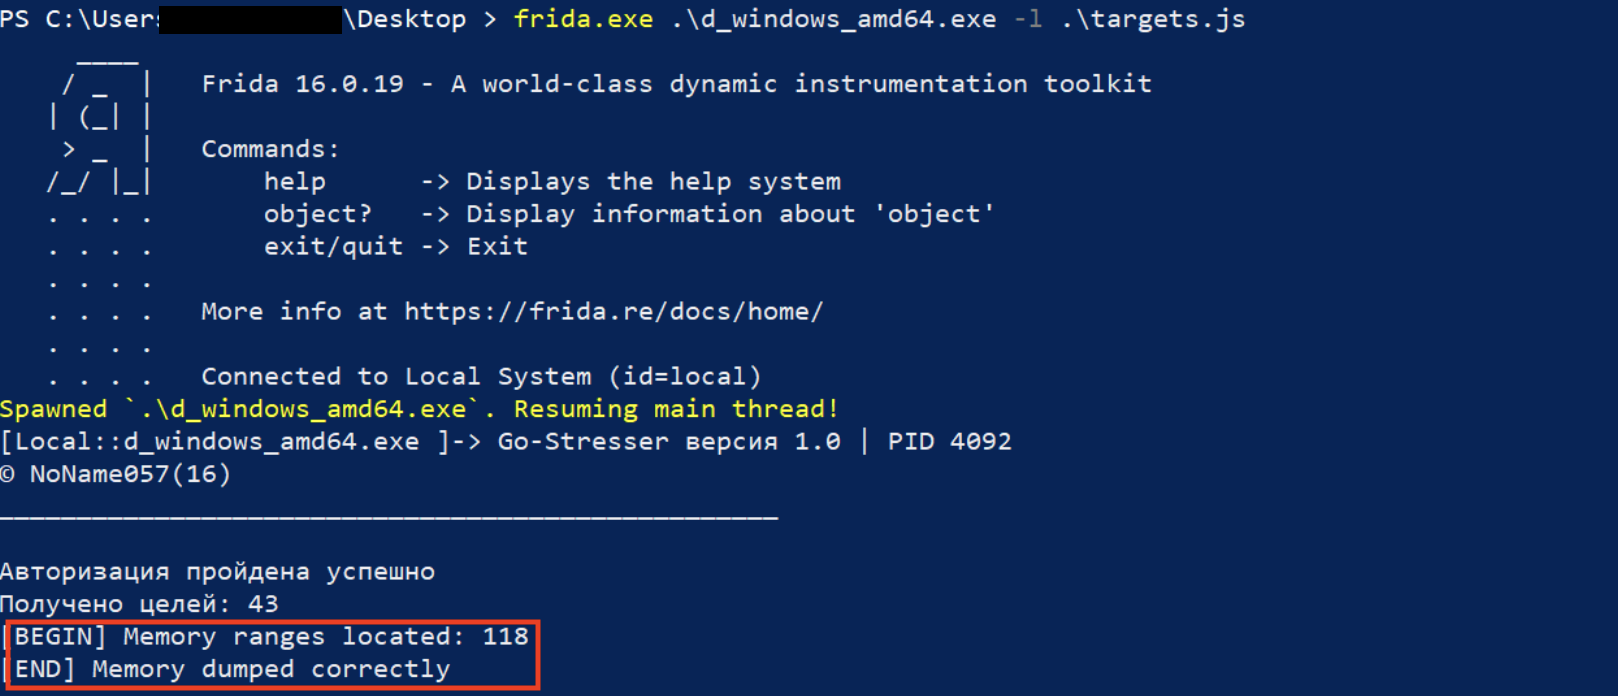
Figure 5 - Dumping process Memory with Frida
Now you can navigate in dumps folder and run the python script using the following command line that is going to forward all dumped file from the current directory to the script that is going to print the result in your console:
python.exe recover.py (Get-Item .\*dump)

Figure 6 - Extracting DDosia targets from dump files
Final Notes
Before concluding, It’s worth mentioning that updates on these scripts and new techniques to dealing with further improvements of DDosia project are not going to be shown, because it represents a topic that I’m not following personally and I’m sure that more authoritative voices will keep track of this threat and its evolution.
[2023-11 - UPDATE ]
As mentioned in the section above I’m not able to provide updates on real-time DDosia Project changes, but since it represents a quite good challenge to sharpen my reversing skills on GO binaries (and I received unexpected feedback about this work), I decided to look in their new Windows client version.
Since I would like to keep this update note as brief as possible, I’ll go straight to the point. What really changes and makes the previous frida script ineffective are slightly binary improvements (mostly related to the syscalls used). Because of that I tried to switch monitored syscall to WriteConsoleW, hooking on the message that confirmed the numbers of targets retrieved. I found out that I really needed to change 1 line of the previous script to keep it updated. (Great example of code reuse xD).
Note:
The modification required was pretty easy, however, this change could be also more consistent for further updates (limiting to tweak a little bit with counter variable) since it exploits the feedback messages (e.g., target acquired, requests completed, rewards, etc..) that won’t be removed any time soon.
Moreover, most of this blogpost it’s still a valid reference for setting up the environment and understanding the control flow to retrieve the actual targets, additionally, as far as I know, there were no great changes on the authentication layer. Previous configured environments needs to replace the old binary to the newer provided on DDosia channel.
- New frida script: console.js
References:
| FileName | Sha256 | Date |
|---|---|---|
| d_windows_amd64.exe | 726c2c2b35cb1adbe59039193030f23e552a28226ecf0b175ec5eba9dbcd336e | 2023/04/19 |
| (new sample) d_win_x64.exe | 1b53443ebaabafd6f511d4cf7cb85ddf9fa32540c5dd5621f04a3c5eefa663a9 | 2023/11/09 |
1374 Words
2023-05-08 02:00