9 minutes
Understanding API Hashing and build a rainbow table for LummaStealer
Understanding PEB and Ldr structures represents a starting point when we are dealing with API hashing. However, before proceeding to analyze a sample it’s always necessary to recover obfuscated, encrypted or hashed data. Because of that, through this blogpost I would like to continue what I have started in the previous post, using emulation to create a rainbow table for LummaStealer and then write a little resolver script that is going to use the information extracted to resolve all hashes.
💡It’s worth mentioning that I’m trying to create self-contained posts. Of course, previous information will give a more comprehensive understanding of the whole process, however, the goal for this post is to have a guide that could be applied overtime even on different samples not related to LummaStealer.
Resolving Hashes
Starting from where we left in the last post, we could explore the function routine that is in charge of collecting function names from a DLL and then perform a hashing algorithm to find a match with the input name.

Figure 1: LummaStealer API Hashing overview
At the first glance, this function could be disorienting, however, understanding that ecx contains the module BaseAddress (explained in the previous article) it is possible to set a comment that is going to make the whole function easier to understand. Moreover, it has been also divided in three main parts( first two are going to be detailed in the next sections):
- Collecting exported function within a PE file;
- Hashing routine;
- Compare hashing result until a match is found, otherwise return 0; (skipped because of a simple comparing routine)
Collecting exported function within a PE file
The first box starts with the instruction mov edi, ecx where ecx is a BaseAddress of a module that is going to be analyzed. This is a fundamental instruction that gives us a chance to infere the subsequent value of edi and ebx. In fact, if we rename values associated to these registers, it should be clear that this code is going to collect exported functions names through AddressOfNames and AddressOfNameOrdinals pointers.

Figure 2: Resolving structures names
Those structures are very important in order to understand what is happening in the code. For now, you could think about those structures as support structures that could be chained together in order to collect the actual function pointer (after a match is found!) within the Address of a Function structure.
💡 At the end of this article I created a dedicated sections to explain those structures and their connections.
Another step that could misleading is related to the following instruction:
mov ebx,[eax+edi+IMAGE_NT_HEADERS.OptionaHeader.DataDirectory.VirtualAddress]
where ebx becomes a pointer for IMAGE_EXPORT_DIRECTORY.
In order to explain this instruction its useful to have a look at IMAGE_OPTIONAL_HEADERS documentation, where Microsoft states that DataDirectory is pointer to a dedicated structure called IMAGE_DATA_DIRECTORY that could be addressed through a number.
 typedef struct _IMAGE_OPTIONAL_HEADER {
 ...
 IMAGE_DATA_DIRECTORY DataDirectory[IMAGE_NUMBEROF_DIRECTORY_ENTRIES];
 }
With that information let’s do some math unveiling the magic behind this assignment.
- eax corresponds to the IMAGE_NT_HEADERS (because of its previous assignment)
From there we have a 0x78 offset to sum. If we sum the first 18 bytes from eax, it’s possible to jump to the IMAGE_OPTIONAL_HEADER. Using the 60 bytes remaining to reach the next field within this structure, we could see that we are directly pointing to DataDirectory.
typedef struct **_IMAGE_NT_HEADERS** {
 0x0000 DWORD                   Signature;
 0x0004 IMAGE_FILE_HEADER       FileHeader;
 ...
 0x0018 IMAGE_OPTIONAL_HEADER32 OptionalHeader;
} IMAGE_NT_HEADERS32, *PIMAGE_NT_HEADERS32;

typedef struct **_IMAGE_OPTIONAL_HEADER** {
 0x0000 WORD                 Magic;
 ...
 0x001C DWORD                ImageBase;
 ...
 0x0060 IMAGE_DATA_DIRECTORY DataDirectory[IMAGE_NUMBEROF_DIRECTORY_ENTRIES];
} IMAGE_OPTIONAL_HEADER32, *PIMAGE_OPTIONAL_HEADER32;
From here, we don’t have additional bytes to sum, it means that we are pointing to the first structure pointed by DataDirectory, that is, according to the documentation the IMAGE_DIRECTORY_ENTRY_EXPORT also known as Export Directory.
💡 See Reference section to find out a more clear image about the whole PE structure
Retrieve the function pointer
Once the code in charge to collect and compare exported functions has been completed, and a match is found, it’s time to retrieve the actual function pointer using some of the structures mentioned above. In fact, as you can see from the code related to the third box (that has been renamed accordingly), once the match if found, the structure AddressOfNameOrdinals it’s used to retrieve the functions number that is going to address the structure AddressOfFunctions that contains the actual function pointers.

Figure 3: Collect the actual function pointer
💡I don’t want to bother you with so much details at this point, since we have already analyzed throughly some structures and we still have additional contents to discuss. However, the image above has been thought to be self-contained. That said, to not get lost please remember that edi represents the Ldr_Module.BaseAddress
Analyze the hashing routine
Through the information collected so far, this code should be childishly simple.
ecx contains the hash name extracted from the export table that is going to forward as input to the hash function (identified, in this case, as murmur2). The function itself is quite long but does not take too much time to be understood and reimplemented. However, the purpose of this article is to emulate this code in order to find out the values of all hardcoded hashes.
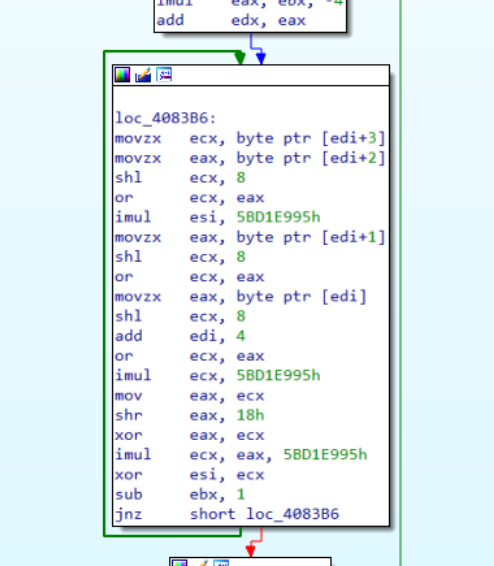 Figure 4: MurMur2 hashing routine
As we have already done, we could select the function opcodes (without the return instruction) and put them in our code emulator routine. It’s worth mentioning that, ecx contains the function name that is going to be used as argument for hashing routine, because of that, it’s important to assign that register properly.
def MurMurHash2(func_name):
    code = bytes.fromhex('56 57 8B F9 8B D7 8D 4A 01 8A 02 42 84 C0 75 F9 2B D1 8B F2 83 F6 20 83 FA 04 7C 4D 53 8B DA C1 EB 02 6B C3 FC 03 D0 0F B6 4F 03 0F B6 47 02 C1 E1 08 0B C8 69 F6 95 E9 D1 5B 0F B6 47 01 C1 E1 08 0B C8 0F B6 07 C1 E1 08 83 C7 04 0B C8 69 C9 95 E9 D1 5B 8B C1 C1 E8 18 33 C1 69 C8 95 E9 D1 5B 33 F1 83 EB 01 75 BF 5B 83 EA 01 74 1C 83 EA 01 74 0E 83 EA 01 75 1D 0F B6 47 02 C1 E0 10 33 F0 0F B6 47 01 C1 E0 08 33 F0 0F B6 07 33 C6 69 F0 95 E9 D1 5B 8B C6 C1 E8 0D 33 C6 69 C8 95 E9 D1 5B 5F 5E 8B C1 C1 E8 0F 33 C1')
    ... # skip code
    uc.mem_write(data_base, func_name)

    # Set function argument
    uc.reg_write(UC_X86_REG_ECX, data_base)
    ... # skip code
    uc.emu_start(target_base, target_end, timeout=0, count=0)
    ... # skip code
    EAX = uc.reg_read(UC_X86_REG_EAX)
    return EAX
Let’s take a test. Using the LoadLibraryW name, we get back 0xab87776c. If we explore a little bit our code, we will find almost immediately this value! it is called each time a new hash needs to be resolved.

Figure 5: LoadLibraryW Hash
This behavior is a clear indication that before proceeding to extract exported functions, we need to load the associated library (DLL) in memory. With that information we could be sure that our emulator works fine.
Build a rainbow table
Building a rainbow table can be done in a few lines of code:
filter = ['ntdll.dll']

def get_all_export_function_from_dlls():
    exported_func = {}
    for dirpath, dirnames, filenames in os.walk("C:\\Windows\\System32"):
        for filename in [f for f in filenames if f in filter]:
            path_to_dll = os.path.join(dirpath, filename)
            pe = pefile.PE(path_to_dll)
            for export in pe.DIRECTORY_ENTRY_EXPORT.symbols:
                if not export.name:
                    continue
                else:
                    exported_func[hex(MurMurHash2(export.name))] = export.name
    return exported_func
The code presented above should be pretty clear, however, I would like to point out the role of the filter variable. Emulation brings a lot of advantages to reverse engineering, nevertheless, it also has a drawback related to performance. In fact, code that contains an emulation routine could be tremendously slow, and if you don’t pay attention it could take forever. Using a filter variable keeps our code more flexible, resolving tailored functions names without wasting time.
💡Of course, in this case we could look for libraries names used within the code. However, we could not be so lucky in the future. Because of that, I prefer to show a way that could be used in multiple situations.
Automation
Now that we have built almost all fundamental components, it’s time to combine everything in a single and effective script file. What we are still missing is a regular expression that is going to look for hashes and forward them to the MurMur2 emulator.
Observing the code, an easy pattern to follow involves a register and an immediate values:
mov REG, IMM
Implementing this strategy and filtering results only on kernel32.dll, we are able to extract all referenced hashes:

Figure 6: Some hashes related to Kernel32.dll
Conclusion
As always, going deep in each section requires an entire course and at the moment it’s an impossible challenge. However, through this blog post I tried to scratch the surface giving some essential concepts (that could be applied straightaway) to make reversing time a lot more fun.
Another important thing to highlight here, is related to combine emulation and scripting techniques. Emulation is great, however, writing a script that contains some emulated routine could be a challenging task if we think about efficiency. Writing a single script for a single sample its not a big deal and it won’t have a great impact in a single analysis, however, doing it a scale is a different kettle of fish.
That said, it’s time to conclude, otherwise, even reading this post could be a challenging task! :)
Have fun and keep reversing!
References:
Windows PE file format:
LummaStealer Hash resolver:
LummaSteler sample:
Bonus
In order to understand how API Hashing works it’s very useful to make your hand dirty on low level components. However, once you have some experience, it is also very helpful to have some tools that speed up your analysis. An amazing project is HashDB maintained by OALabs. It is a simple and effective plugin for IDA and Binary Ninja that is going to resolve hashes, if the routine is implemented. If you want to try out this plugin for this LummaStealer sample, my pull request has already been merged ;)
Appendix 1 - AddressOfNames
The algorithm to retrieve the RVA associated to a function is quite straightforward:
- Iterate over the AddressOfNames structures.
- Once you find a match with a specific function, suppose at i position, the loader is going to use index i to address the structure AddressOfNamesOrdinals.
- k = AddressOfNamesOrdinals[i]
- After collecting the value stored in AddressOfNamesOrdinals (2.a) we could use that value to address AddressOfFunctions, collecting the actual RVA of the function we were looking for.
function_rva= AddressOfFunctions[k]
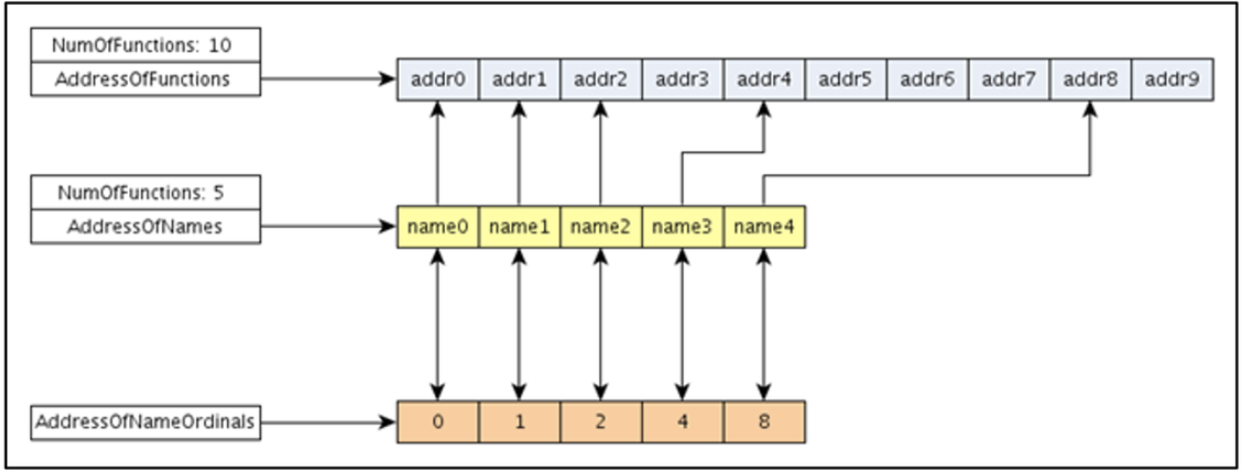
Figure 7: How to retrieve functions names and pointers
💡If you want to experiment a little bit more with this concept, I suggest to take the kernel32.dll library and follows this algorithm using PE-Bear
1838 Words
2024-03-24 01:00